Chúng ta đã tìm hiểu về các thành phần cơ bản nhất của spring rồi, bây giờ là lúc chúng ta tìm hiểu một thư viện cao cấp của spring có tên webmvc. Trong bài này Dũng sẽ cùng các bạn sử dụng spring webmvc và tomcat để tạo ra một trang web đơn giản nhé.
Khởi tạo module
Chúng ta sẽ khởi tạo một module có tên webmvc
Cấu hình module
Bởi vì bản chất spring webmvc không phải là một server (phần mềm máy chủ) nên chúng ta sẽ cần sử dụng tomcat. Chúng ta sẽ cần cập nhật tập tin webmvc/pom.xml.
<?xml version="1.0" encoding="UTF-8"?>
<project xmlns="http://maven.apache.org/POM/4.0.0"
         xmlns:xsi="http://www.w3.org/2001/XMLSchema-instance"
         xsi:schemaLocation="http://maven.apache.org/POM/4.0.0 http://maven.apache.org/xsd/maven-4.0.0.xsd">
    <modelVersion>4.0.0</modelVersion>
    <parent>
        <groupId>vn.techmaster</groupId>
        <artifactId>mastering-spring-boot</artifactId>
        <version>1.0.0</version>
    </parent>

    <groupId>vn.techmaster</groupId>
    <artifactId>webmvc</artifactId>

    <dependencies>
        <dependency>
            <groupId>org.springframework</groupId>
            <artifactId>spring-webmvc</artifactId>
            <version>${spring.version}</version>
        </dependency>
        <dependency>
            <groupId>org.apache.tomcat.embed</groupId>
            <artifactId>tomcat-embed-core</artifactId>
            <version>${tomcat.version}</version>
        </dependency>
        <dependency>
            <groupId>org.apache.tomcat</groupId>
            <artifactId>tomcat-jasper</artifactId>
            <version>${tomcat.version}</version>
        </dependency>
    </dependencies>
</project>
Ở đây chúng ta sẽ sử dụng tomcat embbeded.
MVC
Đây là một mô hình khá kinh điển trong lập trình, cũng có nhiều cách cài đặt khác nhau, một trong số các cài đặt có sơ đồ như sau:
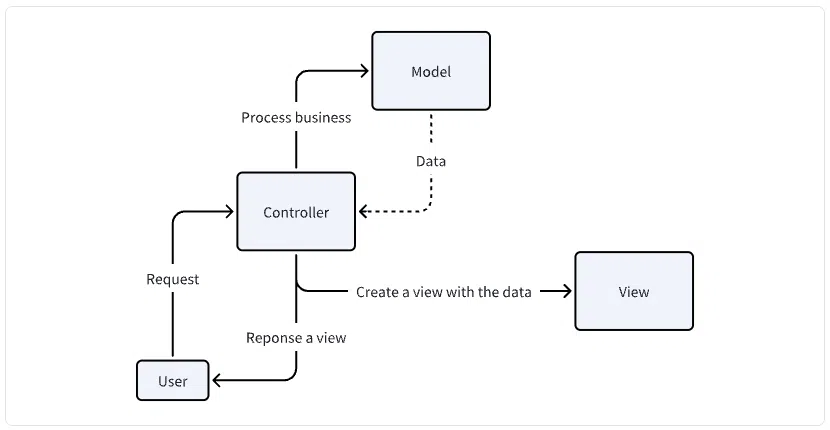
- Controller: Là lớp đầu tiên nhận được yêu cầu của người dùng gửi đến, ví dụ là yêu truy cập trang chủ của website abc.com
- Model: Controller sẽ tiếp nhận yêu cầu nhưng nó sẽ không xử lý mà gọi đến tầng Model. Ở tầng Model nó sẽ xử lý nghiệp vụ, tương tác với cơ sở dữ liệu và trả về dữ liệu kết quả cho Controller.
- Controller sử dụng dữ liệu kết quả để tạo ra một View và trả về cho người dùng.
Đối với website thì View chính là html, javascript và css.
Servlet
Là một khái niệm tương đối khó hiểu của thư viện tiêu chuẩn của JavaEE dành cho lập trình http, tuy nhiên về bản chất thì nó là một lớp observer.
public abstract class HttpServlet extends GenericServlet {

    @Override
    public void init(ServletConfig config) throws ServletException {
    }

    protected void doGet(HttpServletRequest req, HttpServletResponse resp) throws ServletException, IOException {
    }

    protected void doHead(HttpServletRequest req, HttpServletResponse resp) throws ServletException, IOException {
    }

    protected void doPatch(HttpServletRequest req, HttpServletResponse resp) throws ServletException, IOException {
    }

    protected void doPost(HttpServletRequest req, HttpServletResponse resp) throws ServletException, IOException {
    }

    protected void doPut(HttpServletRequest req, HttpServletResponse resp) throws ServletException, IOException {    }

    protected void doDelete(HttpServletRequest req, HttpServletResponse resp) throws ServletException, IOException {
    }
}
Nó lắng nghe sự kiện khởi tạo hay các sự kiện khi người dùng gửi yêu cầu với các phương thức khác nhau trong tiêu chuyển của giao thức http như doGet, doPath, doPost, doPut, doDelete.
Cài đặt mã nguồn cấu hình
Đầu tiên chúng ta sẽ cần khai báo một lớp WebAppInitializer để khởi tạo một Servlet tiếp nhận yêu cầu của người dùng sau đó chuyển cho lớp controller mà chúng ta sẽ cài đặt bên dưới:
package vn.techmaster.webmvc.config;

import jakarta.servlet.ServletContext;
import jakarta.servlet.ServletRegistration;
import org.springframework.web.WebApplicationInitializer;
import org.springframework.web.context.support.AnnotationConfigWebApplicationContext;
import org.springframework.web.servlet.DispatcherServlet;

public class WebAppInitializer implements WebApplicationInitializer {

    @Override
    public void onStartup(ServletContext servletContext) {
        AnnotationConfigWebApplicationContext context =
            new AnnotationConfigWebApplicationContext();
        context.setConfigLocation("vn.techmaster.webmvc");
        ServletRegistration.Dynamic dispatcher = servletContext
            .addServlet("dispatcher", new DispatcherServlet(context));
        dispatcher.setLoadOnStartup(1);
        dispatcher.addMapping("/");
    }
}
Bạn có thấy điều gì đặc biệt ở lớp này không? Đó là nó không có bất kỳ annotation nào, vậy tại sao nó lại được khởi tạo? Đó là do bên trong thư viện spring-web có khai báo một tập tin META-INF/services/jakarta.servlet.ServletContainerInitializer, nội dung của thư mục này là:

Nó sẽ chỉ cho tomcat biết rằng hãy đọc lớp SpringServletContainerInitializer khi khởi tạo. Trong lớp SpringServletContainerInitializer chúng ta có:
@HandlesTypes(WebApplicationInitializer.class)
public class SpringServletContainerInitializer implements ServletContainerInitializer {
Nó chỉ ra rằng sẽ cần xử lý các lớp có kiểu WebApplicationInitializer, mà lớp WebAppInitializer của chúng ta lại cài đặt WebApplicationInitializer, đây chính là nguyên nhân tại sao tomcat lại biết để mà khởi tạo lớp của chúng. Lập trình thật là bí ẩn và ảo diệu đúng không?
Tiếp theo chúng ta sẽ cần khai báo lớp WebConfig như sau:
package vn.techmaster.webmvc.config;

import org.springframework.context.annotation.Bean;
import org.springframework.context.annotation.ComponentScan;
import org.springframework.context.annotation.Configuration;
import org.springframework.web.servlet.config.annotation.EnableWebMvc;
import org.springframework.web.servlet.view.InternalResourceViewResolver;

@Configuration
@EnableWebMvc
@ComponentScan(basePackages = "vn.techmaster.webmvc")
public class WebConfig {

    @Bean
    public InternalResourceViewResolver viewResolver() {
        InternalResourceViewResolver viewResolver = new InternalResourceViewResolver();
        viewResolver.setPrefix("/templates/");
        viewResolver.setSuffix(".jsp");
        return viewResolver;
    }
}
Đây là một lớp để cấu hình thư mục chứa các tập tin view. Cụ thể ở đây là các tập tin kết thúc bằng đuôi .jsp nằm trong thư mục /templates/.
Cài đặt mã nguồn controller
Theo đúng mô hình MVC, chúng ta sẽ cần cài đặt một lớp controller để tiếp nhận yêu cầu của người dùng như sau:
package vn.techmaster.webmvc.controller;

import lombok.AllArgsConstructor;
import org.springframework.stereotype.Controller;
import org.springframework.web.bind.annotation.GetMapping;
import org.springframework.web.bind.annotation.RequestMapping;
import org.springframework.web.servlet.ModelAndView;
import vn.techmaster.webmvc.model.MessageService;

@Controller
@RequestMapping("/")
@AllArgsConstructor
public class HomeController {

    private final MessageService messageService;

    @GetMapping
    public ModelAndView home() {
        String message = messageService.getMessage();
        ModelAndView modelAndView = new ModelAndView("home");
        modelAndView.addObject("message", message);
        return modelAndView;
    }
}
- Lớp controller này sẽ sử dụng lớp MessageService thuộc tầng model để xử lý nghiệp vụ lấy tin nhắn.
- Sau đó nó sẽ tạo ra một đối tượng view có tên là home, truyền tin nhắn vào cho view home này.
- Trả về view cho trình duyệt để hiển thị cho người dùng.
View home sử dụng một tập tin home.jsp như sau:
<!DOCTYPE html>
<html>
<head>
    <title>Home</title>
</head>
<body>
    <h1>${message}</h1>
</body>
</html>
Đây là một tập tin dạng mẫu (template), trước khi trả về cho người dùng thì spring hoặc tomcat sẽ thông dịch mẫu thành html và trả về cho trình duyệt để hiển thị cho người dùng.
Cài đặt mã nguồn model
Tiếp tục cài đặt theo mô hình MVC đã thiết kế, chúng ta sẽ tạo ra lớp MessageService để xử lý nghiệp vụ lấy tin nhắn.
package vn.techmaster.webmvc.model;
import org.springframework.stereotype.Component;
@Component
public class MessageService {
public String getMessage() {
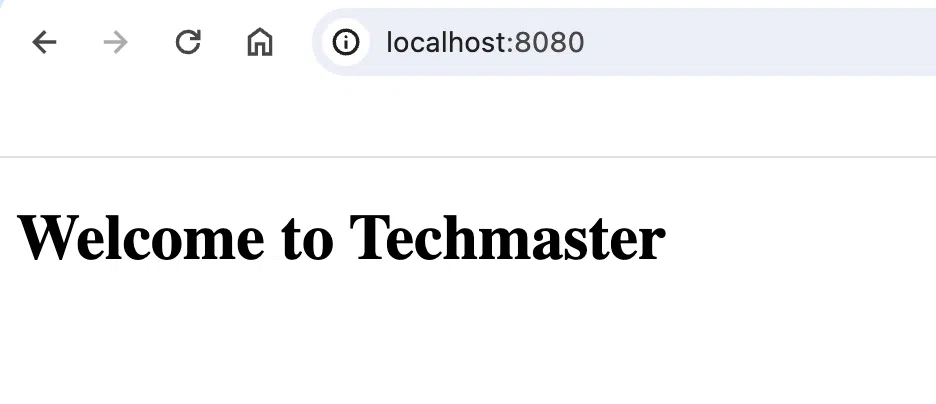
return "Welcome to Techmaster";
}
}
Lớp này cũng không xử lý gì nhiều nó chỉ trả về một tin nhắn “Welcome to Techmaster” mà thôi.
Cài đặt mã nguồn tomcat server
Như chúng ta thấy, về bản chất spring webmvc không phải là một thư viện phần mềm máy chủ, nó chỉ tận dụng cơ chế quản lý bean của mình để cung cấp các thành phần cần thiết như cấu hình, servlet cho tomcat mà thôi, dưới đây là mã nguồn để chúng ta khởi tạo và khởi động tomcat.
package vn.techmaster.webmvc;

import org.apache.catalina.connector.Connector;
import org.apache.catalina.startup.Tomcat;

import java.io.File;

public class WebMvcStartUp {

    public static void main(String[] args) throws Exception {
        String webappDirLocation = "src/main/resources/";
        Tomcat tomcat = new Tomcat();
        Connector connector = new Connector();
        connector.setPort(8080);
        tomcat.setConnector(connector);
        tomcat.addWebapp(
            "/",
            new File(webappDirLocation).getAbsolutePath()
        );
        tomcat.start();
        System.out.println("server started");
        tomcat.getServer().await();
    }
}
Khi bạn chạy chương trình, một máy chủ sẽ được chạy và lắng nghe dữ liệu từ cổng 8080. Bạn có thể truy cập vào trang http://localhost:8080/ và một trang web sẽ hiển thị lên như sau:
Tổng kết
Chúng ta đã cùng nhau:
- Tìm hiểu về MVC.
- Tìm hiểu về Servlet.
- Cấu hình và cài đặt một máy chủ web sử dụng spring mvc và tomcat.
Cám ơn bạn đã quan tâm đến bài viết|video này. Để nhận được thêm các kiến thức bổ ích bạn có thể:
- Đọc các bài viết của TechMaster trên facebook: https://www.facebook.com/techmastervn
- Xem các video của TechMaster qua Youtube: https://www.youtube.com/@TechMasterVietnam nếu bạn thấy video/bài viết hay bạn có thể theo dõi kênh của TechMaster để nhận được thông báo về các video mới nhất nhé.
- Chat với techmaster qua Discord: https://discord.gg/yQjRTFXb7a
- Đăng ký khoá học spring boot của techmaster: https://java.techmaster.vn/ nhé
Bình luận