Học viên: Phạm Ngọc Huyền
Lớp: Flutter04
Bài viết được dịch từ : Flutter - Animation
Giới thiệu
Animation là một quá trình hiển thị một loạt hình ảnh theo một thứ tự cụ thể trong một khoảng thời gian cụ thể để tạo ảo giác về chuyển động. Các khía cạnh quan trọng nhất của animation như sau:
- Animation có hai giá trị riêng biệt: Giá trị bắt đầu và giá trị kết thúc. Animation bắt đầu từ giá trị bắt đầu và đi qua một loạt các giá trị trung gian và cuối cùng kết thúc ở giá trị kết thúc. Ví dụ: để tạo hiệu ứng cho một widget mờ dần, giá trị ban đầu sẽ là độ mờ hoàn toàn và giá trị cuối cùng sẽ là độ mờ bằng 0.
- Các giá trị trung gian có thể là tuyến tính hoặc phi tuyến tính (đường cong) và nó có thể được cấu hình. Hiểu rằng animation hoạt động như được định cấu hình. Mỗi cấu hình mang lại cảm giác khác nhau cho animation. Ví dụ: việc làm mờ một vật dụng sẽ có bản chất tuyến tính trong khi độ nảy của một quả bóng sẽ có bản chất phi tuyến tính.
- Thời lượng của quá trình animation ảnh hưởng đến tốc độ (chậm hoặc nhanh) của animation.
- Khả năng kiểm soát quá trình animation như bắt đầu animation, dừng animation, lặp lại animation để đặt số lần, đảo ngược quá trình animation, v.v.
- Trong Flutter, hệ thống animation không thực hiện bất kỳ animation thực nào. Thay vào đó, nó chỉ cung cấp các giá trị cần thiết ở mỗi khung hình để hiển thị hình ảnh.
Animation dựa trên Classes
Hệ thống animation Flutter dựa trên các đối tượng animation. Các animation classes cốt lõi và cách sử dụng nó như sau
Animation
Tạo các giá trị nội suy giữa hai số trong một khoảng thời gian nhất định. Các animation classes phổ biến nhất là:
- Animation - nội suy giá trị giữa hai số thập phân
- Animation - nội suy màu giữa hai màu
- Animation - nội suy kích thước giữa hai kích thước
- AnimationController - Đối tượng animation đặc biệt để điều khiển chính animation đó. Nó tạo ra các giá trị mới bất cứ khi nào ứng dụng sẵn sàng cho một khung hình mới. Nó hỗ trợ animation dựa trên tuyến tính và giá trị bắt đầu từ 0.0 đến 1.0
controller = AnimationController(duration: const Duration(seconds: 2), vsync: this);
Ở đây, bộ điều khiển điều khiển animation và tùy chọn thời lượng sẽ kiểm soát thời lượng của quá trình animation. vsync là một tùy chọn đặc biệt được sử dụng để tối ưu hóa tài nguyên được sử dụng trong animation.
CurvedAnimation
Tương tự như AnimationController nhưng hỗ trợ animation phi tuyến tính. CurvedAnimation có thể được sử dụng cùng với đối tượng Animation như bên dưới:
controller = AnimationController(duration: const Duration(seconds: 2), vsync: this);
animation = CurvedAnimation(parent: controller, curve: Curves.easeIn)
Tween
Bắt nguồn từ Animatable và được sử dụng để tạo các số giữa hai số bất kỳ ngoài 0 và 1. Nó có thể được sử dụng cùng với đối tượng Animation bằng cách sử dụng phương thức animate và truyền đối tượng Animation thực tế.
AnimationController controller = AnimationController(
   duration: const Duration(milliseconds: 1000),
vsync: this); Animation<int> customTween = IntTween(
   begin: 0, end: 255).animate(controller);
Tween cũng có thể được sử dụng cùng với CurvedAnimation như dưới đây:
AnimationController controller = AnimationController(
   duration: const Duration(milliseconds: 500), vsync: this);
final Animation curve = CurvedAnimation(parent: controller, curve: Curves.easeOut);
Animation<int> customTween = IntTween(begin: 0, end: 255).animate(curve);
Ở đây, bộ điều khiển là bộ điều khiển animation thực tế. Đường cong cung cấp loại phi tuyến tính và customTween cung cấp phạm vi tùy chỉnh từ 0 đến 255.
Quy trình làm việc của Flutter Animation
Quy trình làm việc của animation như sau:
- Xác định và khởi động bộ điều khiển animation trong initState của StatefulWidget.
AnimationController(duration: const Duration(seconds: 2), vsync: this);
animation = Tween<double>(begin: 0, end: 300).animate(controller);
controller.forward();
- Thêm sự kiện lắng nghe dựa trên animation, addListener để thay đổi trạng thái của widget.
animation = Tween<double>(begin: 0, end: 300).animate(controller) ..addListener(() {
   setState(() {
      // The state that has changed here is the animation object’s value.
   });
});
Bạn có thể sử dụng các widet tích hợp sẵn, AnimatedWidget và AnimatedBuilder để bỏ qua quá trình này. Cả hai tiện ích đều chấp nhận đối tượng animation và nhận các giá trị hiện tại cần thiết cho animation.
Nhận các giá trị animation trong quá trình xây dựng widget và sau đó áp dụng nó cho chiều rộng, chiều cao hoặc bất kỳ thuộc tính có liên quan nào thay vì giá trị ban đầu.
child: Container(
   height: animation.value,
   width: animation.value,
   child: <Widget>,
)
Ứng dụng hoạt động
Chúng ta hãy viết một ứng dụng dựa trên animation đơn giản để hiểu khái niệm animation trong Flutter framework.
- Tạo một ứng dụng Flutter mới trong studio Android, product_animation_app.
- Sao chép thư mục nội dung từ product_nav_app sang product_animation_app và thêm nội dung vào tệp pubspec.yaml.
flutter:
 assets:
  - assets/appimages/floppy.png
  - assets/appimages/iphone.png
  - assets/appimages/laptop.png
  - assets/appimages/pendrive.png
  - assets/appimages/pixel.png
  - assets/appimages/tablet.png
- Xóa mã khởi động mặc định (main.dart).
- Thêm và Import các chức chính cơ bản.
import 'package:flutter/material.dart';
void main() => runApp(MyApp());
- Tạo widget MyApp với StatefulWidgtet.
class MyApp extends StatefulWidget {
   _MyAppState createState() => _MyAppState();
}
- Tạo widget _MyAppState và triển khai initState và loại bỏ phương thức build mặc định.
class _MyAppState extends State<MyApp> with SingleTickerProviderStateMixin {
   Animation<double> animation;
   AnimationController controller;
   @override void initState() {
      super.initState();
      controller = AnimationController(
         duration: const Duration(seconds: 10), vsync: this
      );
      animation = Tween<double>(begin: 0.0, end: 1.0).animate(controller);
      controller.forward();
   }
   // This widget is the root of your application.
   @override
   Widget build(BuildContext context) {
      controller.forward();
      return MaterialApp(
         title: 'Flutter Demo',
         theme: ThemeData(primarySwatch: Colors.blue,),
         home: MyHomePage(title: 'Product layout demo home page', animation: animation,)
      );
   }
   @override
   void dispose() {
      controller.dispose();
      super.dispose();
   }
}
- Trong phương thức initState, chúng ta đã tạo một đối tượng điều khiển animation (bộ điều khiển), một đối tượng animation (animation) và bắt đầuanimation bằng cách sử dụng control.forward.
- Trong phương thức xử lý, chúng tôi đã xử lý đối tượng bộ điều khiển animation (bộ điều khiển).
- Trong phương thức xây dựng, gửi animation đến widget MyHomePage thông qua constructor. Giờ đây, widget MyHomePage có thể sử dụng đối tượng animation để tạo animate cho nội dung của nó.
- Bây giờ, hãy thêm widget ProductBox
class ProductBox extends StatelessWidget {
   ProductBox({Key key, this.name, this.description, this.price, this.image})
      : super(key: key);
   final String name;
   final String description;
   final int price;
   final String image;

   Widget build(BuildContext context) {
      return Container(
         padding: EdgeInsets.all(2),
         height: 140,
         child: Card(
            child: Row(
               mainAxisAlignment: MainAxisAlignment.spaceEvenly,
               children: <Widget>[
                  Image.asset("assets/appimages/" + image),
                  Expanded(
                     child: Container(
                        padding: EdgeInsets.all(5),
                        child: Column(
                           mainAxisAlignment: MainAxisAlignment.spaceEvenly,
                           children: <Widget>[
                              Text(this.name, style:
                                 TextStyle(fontWeight: FontWeight.bold)),
                              Text(this.description),
                                 Text("Price: " + this.price.toString()),
                           ],
                        )
                     )
                  )
               ]
            )
         )
      );
   }
}
- Tạo một widget mới, MyAnimatedWidget để thực hiện animation mờ dần đơn giản bằng cách sử dụng độ mờ.
class MyAnimatedWidget extends StatelessWidget {
   MyAnimatedWidget({this.child, this.animation});

   final Widget child;
   final Animation<double> animation;

   Widget build(BuildContext context) => Center(
   child: AnimatedBuilder(
      animation: animation,
      builder: (context, child) => Container(
         child: Opacity(opacity: animation.value, child: child),
      ),
      child: child),
   );
}
- Ở đây, chúng tôi đã sử dụng AnatedBuilder để thực hiện animation của mình. AnimatedBuilder là một widget giúp xây dựng nội dung trong khi thực hiện animation cùng một lúc. Nó chấp nhận một đối tượng animation để nhận giá trị animation hiện tại. Chúng tôi đã sử dụng giá trị animation, animation.value để đặt độ mờ của widget con. Trên thực tế, widget này sẽ tạo hiệu ứng cho widget con bằng cách sử dụng khái niệm độ mờ.
- Cuối cùng, tạo widget MyHomePage và sử dụng đối tượng animation để tạo animate cho bất kỳ nội dung nào của nó.
class MyHomePage extends StatelessWidget {
   MyHomePage({Key key, this.title, this.animation}) : super(key: key);

   final String title;
   final Animation<double>
   animation;

   @override
   Widget build(BuildContext context) {
      return Scaffold(
         appBar: AppBar(title: Text("Product Listing")),body: ListView(
            shrinkWrap: true,
            padding: const EdgeInsets.fromLTRB(2.0, 10.0, 2.0, 10.0),
            children: <Widget>[
               FadeTransition(
                  child: ProductBox(
                     name: "iPhone",
                     description: "iPhone is the stylist phone ever",
                     price: 1000,
                     image: "iphone.png"
                  ), opacity: animation
               ),
               MyAnimatedWidget(child: ProductBox(
                  name: "Pixel",
                  description: "Pixel is the most featureful phone ever",
                  price: 800,
                  image: "pixel.png"
               ), animation: animation),
               ProductBox(
                  name: "Laptop",
                  description: "Laptop is most productive development tool",
                  price: 2000,
                  image: "laptop.png"
               ),
               ProductBox(
                  name: "Tablet",
                  description: "Tablet is the most useful device ever for meeting",
                  price: 1500,
                  image: "tablet.png"
               ),
               ProductBox(
                  name: "Pendrive",
                  description: "Pendrive is useful storage medium",
                  price: 100,
                  image: "pendrive.png"
               ),
               ProductBox(
                  name: "Floppy Drive",
                  description: "Floppy drive is useful rescue storage medium",
                  price: 20,
                  image: "floppy.png"
               ),
            ],
         )
      );
   }
}
Ở đây, chúng tôi đã sử dụng FadeAnimation và MyAnimationWidget để tạo animation cho hai mục đầu tiên trong danh sách. FadeAnimation là một class animation tích hợp mà chúng tôi đã sử dụng để tạo animate cho class con của nó bằng cách sử dụng khái niệm độ mờ.
- Mã hoàn chỉnh như sau:
import 'package:flutter/material.dart';
void main() => runApp(MyApp());

class MyApp extends StatefulWidget {
   _MyAppState createState() => _MyAppState();
}
class _MyAppState extends State<MyApp> with SingleTickerProviderStateMixin {
   Animation<double> animation;
   AnimationController controller;

   @override
   void initState() {
      super.initState();
      controller = AnimationController(
         duration: const Duration(seconds: 10), vsync: this);
      animation = Tween<double>(begin: 0.0, end: 1.0).animate(controller);
      controller.forward();
   }
   // This widget is the root of your application.
   @override
   Widget build(BuildContext context) {
      controller.forward();
      return MaterialApp(
         title: 'Flutter Demo', theme: ThemeData(primarySwatch: Colors.blue,),
         home: MyHomePage(title: 'Product layout demo home page', animation: animation,)
      );
   }
   @override
   void dispose() {
      controller.dispose();
      super.dispose();
   }
}
class MyHomePage extends StatelessWidget {
   MyHomePage({Key key, this.title, this.animation}): super(key: key);
   final String title;
   final Animation<double> animation;

   @override
   Widget build(BuildContext context) {
      return Scaffold(
         appBar: AppBar(title: Text("Product Listing")),
         body: ListView(
            shrinkWrap: true,
            padding: const EdgeInsets.fromLTRB(2.0, 10.0, 2.0, 10.0),
            children: <Widget>[
               FadeTransition(
                  child: ProductBox(
                     name: "iPhone",
                     description: "iPhone is the stylist phone ever",
                     price: 1000,
                     image: "iphone.png"
                  ),
                  opacity: animation
               ),
               MyAnimatedWidget(
                  child: ProductBox(
                     name: "Pixel",
                     description: "Pixel is the most featureful phone ever",
                     price: 800,
                     image: "pixel.png"
                  ),
                  animation: animation
               ),
               ProductBox(
                  name: "Laptop",
                  description: "Laptop is most productive development tool",
                  price: 2000,
                  image: "laptop.png"
               ),
               ProductBox(
                  name: "Tablet",
                  description: "Tablet is the most useful device ever for meeting",
                  price: 1500,
                  image: "tablet.png"
               ),
               ProductBox(
                  name: "Pendrive",
                  description: "Pendrive is useful storage medium",
                  price: 100,
                  image: "pendrive.png"
               ),
               ProductBox(
                  name: "Floppy Drive",
                  description: "Floppy drive is useful rescue storage medium",
                  price: 20,
                  image: "floppy.png"
               ),
            ],
         )
      );
   }
}
class ProductBox extends StatelessWidget {
   ProductBox({Key key, this.name, this.description, this.price, this.image}) :
      super(key: key);
   final String name;
   final String description;
   final int price;
   final String image;
   Widget build(BuildContext context) {
      return Container(
         padding: EdgeInsets.all(2),
         height: 140,
         child: Card(
            child: Row(
               mainAxisAlignment: MainAxisAlignment.spaceEvenly,
               children: <Widget>[
                  Image.asset("assets/appimages/" + image),
                  Expanded(
                     child: Container(
                        padding: EdgeInsets.all(5),
                        child: Column(
                           mainAxisAlignment: MainAxisAlignment.spaceEvenly,
                           children: <Widget>[
                              Text(
                                 this.name, style: TextStyle(
                                    fontWeight: FontWeight.bold
                                 )
                              ),
                              Text(this.description), Text(
                                 "Price: " + this.price.toString()
                              ),
                           ],
                        )
                     )
                  )
               ]
            )
         )
      );
   }
}
class MyAnimatedWidget extends StatelessWidget {
   MyAnimatedWidget({this.child, this.animation});
   final Widget child;
   final Animation<double> animation;

   Widget build(BuildContext context) => Center(
      child: AnimatedBuilder(
         animation: animation,
         builder: (context, child) => Container(
            child: Opacity(opacity: animation.value, child: child),
         ),
         child: child
      ),
   );
}
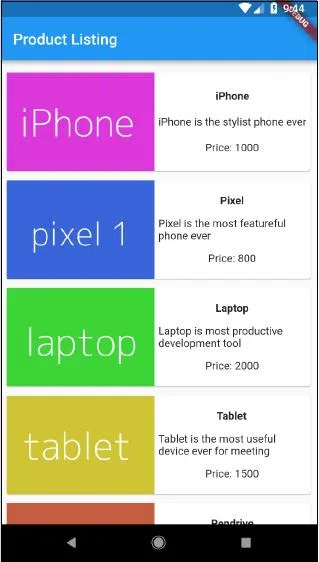
- Biên dịch và chạy ứng dụng để xem kết quả. Phiên bản đầu tiên và cuối cùng của ứng dụng như sau

Bình luận