Trong bài viết này, tôi sẽ hướng dẫn bạn cách triển khai một ứng dụng full-stack sử dụng Golang cho backend và VueJS Quasar cho frontend lên AWS. Chúng ta sẽ sử dụng Terraform để quản lý infrastructure, Nginx làm reverse proxy, và GitHub Actions để tự động hóa quá trình deployment.
Bước 1: Cấu hình Infrastructure với Terraform
1.1. Kiến trúc tổng quan
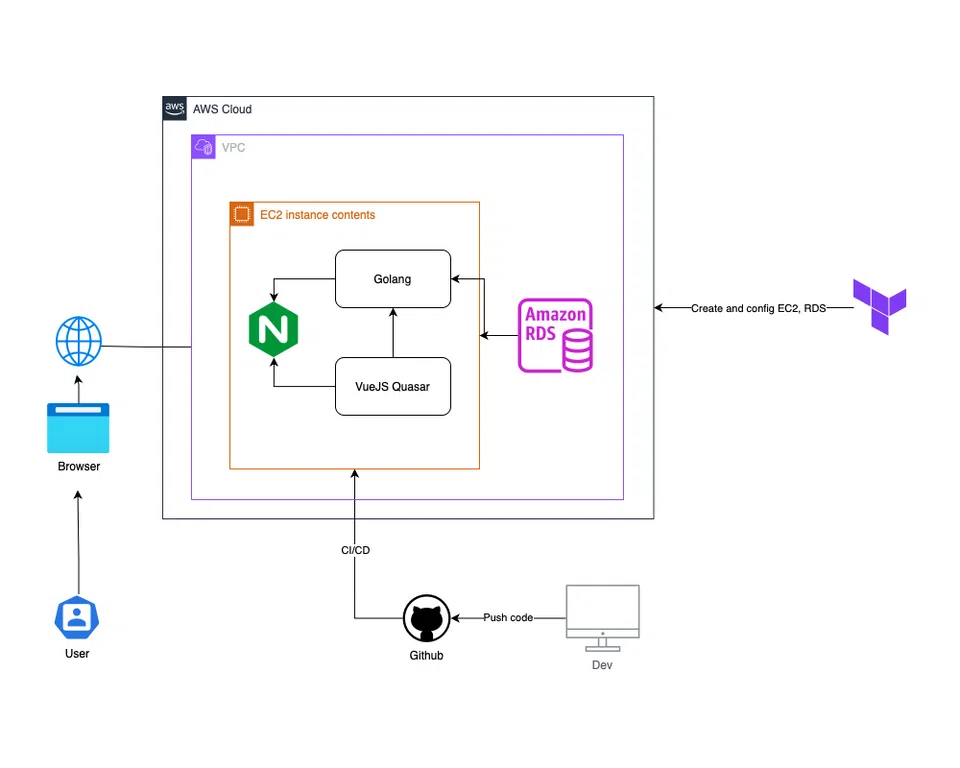
Kiến trúc của hệ thống được thiết kế với các thành phần chính sau:
- EC2 Instance: Chạy cả backend Golang và frontend VueJS Quasar
- RDS PostgreSQL: Database server cho ứng dụng
- Nginx: Reverse proxy và SSL termination
1.2. Cấu trúc VPC và Subnets
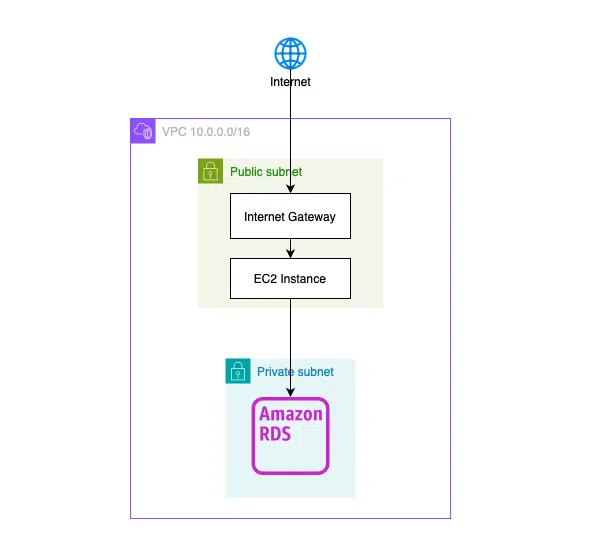
Để đảm bảo tính bảo mật và khả năng mở rộng, chúng ta sẽ tạo một VPC với các subnet riêng biệt cho từng mục đích sử dụng. Việc này giúp:
- Tách biệt các tài nguyên theo chức năng
- Dễ dàng quản lý security groups
- Tối ưu hóa chi phí và hiệu suất
1.2.1. Cấu hình VPC
resource "aws_vpc" "main" {
  cidr_block           = "10.0.0.0/16"
  enable_dns_support   = true
  enable_dns_hostnames = true
}
1.2.2. Cấu hình Subnets
- Public Subnet (EC2):
10.0.1.0/24(AZ-a) - Private Subnet (RDS):
10.0.2.0/24(AZ-a)10.0.3.0/24(AZ-b)10.0.4.0/24(AZ-c)
1.3. Cấu hình Security Groups
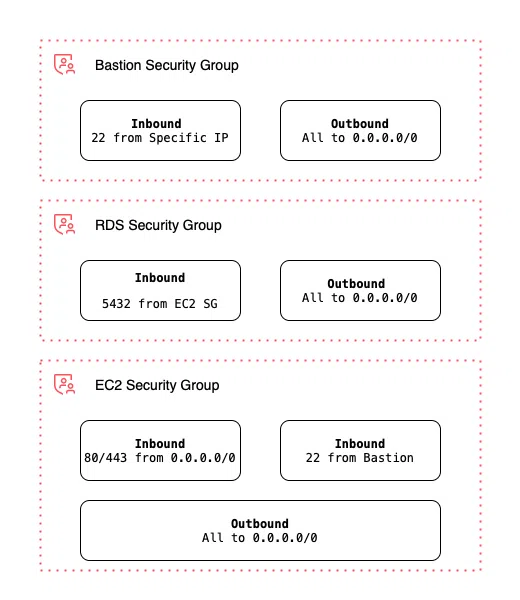
1.3.1. EC2 Security Group
resource "aws_security_group" "ec2_sg" {
  ingress {
    from_port   = 80
    to_port     = 80
    protocol    = "tcp"
    cidr_blocks = ["0.0.0.0/0"]
  }
  ingress {
    from_port   = 443
    to_port     = 443
    protocol    = "tcp"
    cidr_blocks = ["0.0.0.0/0"]
  }
}
1.3.2. RDS Security Group
resource "aws_security_group" "rds_sg" {
  ingress {
    from_port       = 5432
    to_port         = 5432
    protocol        = "tcp"
    security_groups = [aws_security_group.ec2_sg.id]
  }
}
1.4. Cấu hình RDS
resource "aws_db_instance" "rds" {
  engine            = "postgres"
  engine_version    = "17.5"
  instance_class    = "db.t3.micro"
  allocated_storage = 20
  multi_az         = false
}
Bước 2: Cấu hình Domain và SSL
2.1. Cấu hình DNS
2.1.1. Cấu hình DNS Records
Để cấu hình domain cho ứng dụng, bạn cần thực hiện các bước sau. Việc cấu hình DNS đúng cách là rất quan trọng vì nó ảnh hưởng trực tiếp đến khả năng truy cập của người dùng và SEO của website.
Cấu hình A Record cho Backend API:
- Type: A
- Name: api.yourdomain.com
- Value: EC2 Public IP
- TTL: 300 (5 phút)
Cấu hình A Record cho Frontend:
- Type: A
- Name: yourdomain.com
- Value: EC2 Public IP
- TTL: 300 (5 phút)
Cấu hình CNAME Record (tùy chọn):
- Type: CNAME
- Name: www.yourdomain.com
- Value: yourdomain.com
- TTL: 300 (5 phút)
2.1.2. Các bước thực hiện
- Đăng nhập vào trang quản lý DNS của nhà cung cấp domain của bạn
- Tìm đến phần quản lý DNS Records
- Thêm các records theo cấu hình ở trên
- Đợi khoảng 5-10 phút để DNS propagate
2.1.3. Kiểm tra cấu hình
# Kiểm tra DNS resolution
dig api.yourdomain.com
dig yourdomain.com

# Kiểm tra SSL certificate
curl -vI https://api.yourdomain.com
curl -vI https://yourdomain.com
2.2. Cấu hình SSL với Let’s Encrypt
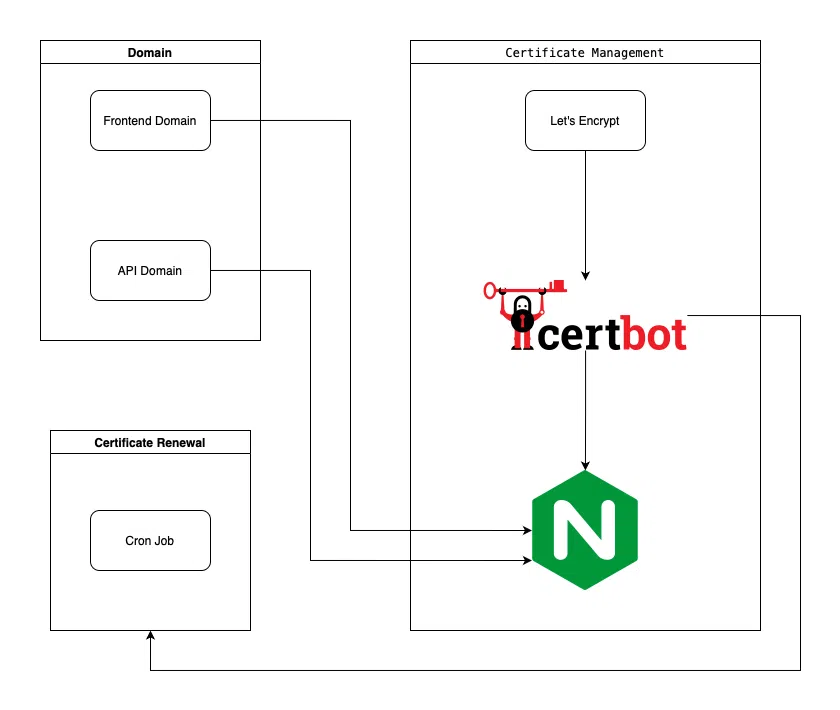
# Cài đặt Certbot
sudo yum update
sudo yum install certbot python3-certbot-nginx

# Cấu hình SSL
sudo certbot --nginx -d yourdomain.com -d api.yourdomain.com
Bước 3: Cấu hình Nginx
3.1. Cấu hình Backend (Golang)
Nginx đóng vai trò quan trọng trong việc:
- Xử lý SSL termination
- Load balancing
- Caching
- Bảo mật với các security headers
- Xử lý CORS
# /etc/nginx/conf.d/nginx.go.conf
server {
    listen 80;
    server_name go.example.com;
    return 301 https://$server_name$request_uri;
}

server {
    listen 443 ssl;
    server_name go.example.com;

    ssl_certificate /etc/letsencrypt/live/go.example.com/fullchain.pem;
    ssl_certificate_key /etc/letsencrypt/live/go.example.com/privkey.pem;

    # SSL configuration
    ssl_protocols TLSv1.2 TLSv1.3;
    ssl_ciphers ECDHE-ECDSA-AES128-GCM-SHA256:ECDHE-RSA-AES128-GCM-SHA256:ECDHE-ECDSA-AES256-GCM-SHA384:ECDHE-RSA-AES256-GCM-SHA384:ECDHE-ECDSA-CHACHA20-POLY1305:ECDHE-RSA-CHACHA20-POLY1305:DHE-RSA-AES128-GCM-SHA256:DHE-RSA-AES256-GCM-SHA384;
    ssl_prefer_server_ciphers off;
    ssl_session_timeout 1d;
    ssl_session_cache shared:SSL:50m;
    ssl_session_tickets off;

    location / {
        proxy_pass http://localhost:8080;
        proxy_http_version 1.1;
        proxy_set_header Upgrade $http_upgrade;
        proxy_set_header Connection 'upgrade';
        proxy_set_header Host $host;
        proxy_cache_bypass $http_upgrade;
        proxy_set_header X-Real-IP $remote_addr;
        proxy_set_header X-Forwarded-For $proxy_add_x_forwarded_for;
        proxy_set_header X-Forwarded-Proto $scheme;

        # CORS headers
        add_header 'Access-Control-Allow-Origin' '*' always;
        add_header 'Access-Control-Allow-Methods' 'GET, POST, PUT, DELETE, OPTIONS' always;
        add_header 'Access-Control-Allow-Headers' 'DNT,User-Agent,X-Requested-With,If-Modified-Since,Cache-Control,Content-Type,Range,Authorization' always;
        add_header 'Access-Control-Expose-Headers' 'Content-Length,Content-Range' always;

        # Security headers
        add_header Strict-Transport-Security "max-age=31536000; includeSubDomains" always;
        add_header X-Frame-Options "SAMEORIGIN" always;
        add_header X-XSS-Protection "1; mode=block" always;
        add_header X-Content-Type-Options "nosniff" always;
        add_header Referrer-Policy "no-referrer-when-downgrade" always;
        add_header Content-Security-Policy "default-src 'self' http: https: data: blob: 'unsafe-inline'" always;

        # Handle preflight requests
        if ($request_method = 'OPTIONS') {
            add_header 'Access-Control-Allow-Origin' '*';
            add_header 'Access-Control-Allow-Methods' 'GET, POST, PUT, DELETE, OPTIONS';
            add_header 'Access-Control-Allow-Headers' 'DNT,User-Agent,X-Requested-With,If-Modified-Since,Cache-Control,Content-Type,Range,Authorization';
            add_header 'Access-Control-Max-Age' 1728000;
            add_header 'Content-Type' 'text/plain; charset=utf-8';
            add_header 'Content-Length' 0;
            return 204;
        }
    }
}
3.2. Cấu hình Frontend (Quasar)
# /etc/nginx/conf.d/nginx.vue.conf
server {
    listen 80;
    server_name vue.example.com;
    return 301 https://$server_name$request_uri;
}

server {
    listen 443 ssl;
    server_name vue.example.com;

    ssl_certificate /etc/letsencrypt/live/vue.example.com/fullchain.pem;
    ssl_certificate_key /etc/letsencrypt/live/vue.example.com/privkey.pem;

    # SSL configuration
    ssl_protocols TLSv1.2 TLSv1.3;
    ssl_ciphers ECDHE-ECDSA-AES128-GCM-SHA256:ECDHE-RSA-AES128-GCM-SHA256:ECDHE-ECDSA-AES256-GCM-SHA384:ECDHE-RSA-AES256-GCM-SHA384:ECDHE-ECDSA-CHACHA20-POLY1305:ECDHE-RSA-CHACHA20-POLY1305:DHE-RSA-AES128-GCM-SHA256:DHE-RSA-AES256-GCM-SHA384;
    ssl_prefer_server_ciphers off;
    ssl_session_timeout 1d;
    ssl_session_cache shared:SSL:50m;
    ssl_session_tickets off;

    root /var/www/html/dist/spa;
    index index.html;

    # API Proxy
    location /api/ {
        proxy_pass http://localhost:8080/;
        proxy_http_version 1.1;
        proxy_set_header Upgrade $http_upgrade;
        proxy_set_header Connection 'upgrade';
        proxy_set_header Host $host;
        proxy_cache_bypass $http_upgrade;
        proxy_set_header X-Real-IP $remote_addr;
        proxy_set_header X-Forwarded-For $proxy_add_x_forwarded_for;
        proxy_set_header X-Forwarded-Proto $scheme;
    }

    # Handle SPA routing
    location / {
        try_files $uri $uri/ /index.html;
        add_header Cache-Control "no-cache, no-store, must-revalidate";
    }

    # Cache static assets
    location /assets/ {
        expires 1y;
        add_header Cache-Control "public, no-transform";
    }

    # Security headers
    add_header Strict-Transport-Security "max-age=31536000; includeSubDomains" always;
    add_header X-Frame-Options "SAMEORIGIN" always;
    add_header X-XSS-Protection "1; mode=block" always;
    add_header X-Content-Type-Options "nosniff" always;
    add_header Referrer-Policy "no-referrer-when-downgrade" always;
    add_header Content-Security-Policy "default-src 'self' http: https: data: blob: 'unsafe-inline'" always;
}
Bước 4: Triển khai tự động với GitHub Actions
4.1. Cấu trúc Workflow
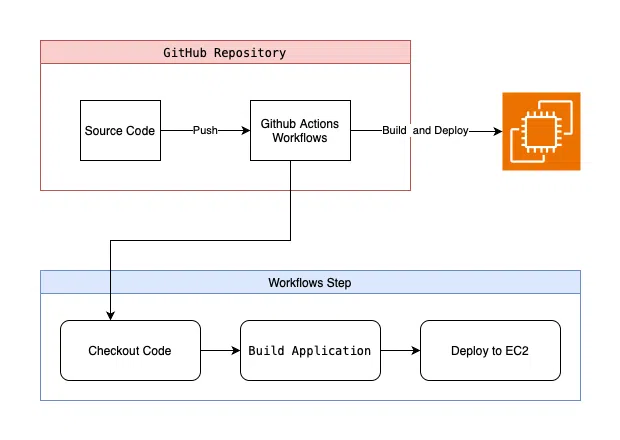
GitHub Actions giúp tự động hóa quá trình deployment, giúp:
- Giảm thiểu lỗi do thao tác thủ công
- Đảm bảo tính nhất quán trong môi trường
- Tăng tốc độ triển khai
- Dễ dàng rollback khi cần thiết
4.2. Backend Workflow
name: Deploy Go App to EC2

on:
  push:
    branches:
      - main

jobs:
  build-and-deploy:
    runs-on: ubuntu-latest

    steps:
      - name: Checkout code
        uses: actions/checkout@v4

      - name: Set up Go
        uses: actions/setup-go@v4
        with:
          go-version: '1.24.0'

      - name: Create .env file
        run: echo "${{ secrets.SERVICE_ENV }}" > .env

      - name: Build binary
        run: |
          go build -o app main.go

      - name: Upload binary and env to EC2
        uses: appleboy/scp-action@v1
        with:
          host: ${{ secrets.EC2_HOST }}
          username: ${{ secrets.EC2_USER }}
          key: ${{ secrets.EC2_SSH_KEY }}
          port: ${{ secrets.EC2_PORT }}
          source: "app,.env"
          target: "/home/${{ secrets.EC2_USER }}/app"
          rm: true

      - name: Upload Nginx configuration
        uses: appleboy/scp-action@v1
        with:
          host: ${{ secrets.EC2_HOST }}
          username: ${{ secrets.EC2_USER }}
          key: ${{ secrets.EC2_SSH_KEY }}
          port: ${{ secrets.EC2_PORT }}
          source: "nginx.go.conf"
          target: "/tmp/nginx"

      - name: Configure and Restart Nginx
        uses: appleboy/ssh-action@v1.0.3
        with:
          host: ${{ secrets.EC2_HOST }}
          username: ${{ secrets.EC2_USER }}
          key: ${{ secrets.EC2_SSH_KEY }}
          port: ${{ secrets.EC2_PORT }}
          script: |
            if [ -f "/tmp/nginx/nginx.go.conf" ]; then
              sudo mv /tmp/nginx/nginx.go.conf /etc/nginx/conf.d/nginx.go.conf
              sudo chown root:root /etc/nginx/conf.d/nginx.go.conf
              sudo chmod 644 /etc/nginx/conf.d/nginx.go.conf
              sudo nginx -t
              sudo systemctl restart nginx
            else
              echo "Nginx configuration file not found"
              exit 1
            fi

      - name: Run Go Application
        uses: appleboy/ssh-action@v1.0.3
        with:
          host: ${{ secrets.EC2_HOST }}
          username: ${{ secrets.EC2_USER }}
          key: ${{ secrets.EC2_SSH_KEY }}
          port: ${{ secrets.EC2_PORT }}
          script: |
            cd /home/${{ secrets.EC2_USER }}/app
            # Kill existing process if running
            pkill app || true
            # Run app in background
            nohup ./app > app.log 2>&1 &
4.3. Frontend Workflow
name: Deploy to EC2

on:
  push:
    branches: [main] # or your default branch

jobs:
  deploy:
    runs-on: ubuntu-latest

    steps:
      - uses: actions/checkout@v3

      - name: Setup Node.js
        uses: actions/setup-node@v3
        with:
          node-version: '22'
          cache: 'npm'

      - name: Create .env file
        run: echo "${{ secrets.SERVICE_ENV }}" > .env

      - name: Install dependencies
        run: npm ci

      - name: Build Quasar app
        run: npm run build

      - name: Setup target directory
        uses: appleboy/ssh-action@master
        with:
          host: ${{ secrets.EC2_HOST }}
          username: ${{ secrets.EC2_USERNAME }}
          key: ${{ secrets.EC2_SSH_KEY }}
          script: |
            sudo mkdir -p /var/www/html
            sudo chown -R $USER:$USER /var/www/html
            rm -rf /var/www/html/*

      - name: Deploy Vue.js app
        uses: appleboy/scp-action@master
        with:
          host: ${{ secrets.EC2_HOST }}
          username: ${{ secrets.EC2_USERNAME }}
          key: ${{ secrets.EC2_SSH_KEY }}
          source: 'dist/spa/*'
          target: '/var/www/html'
          strip_components: 0
          overwrite: true

      - name: Upload Vue.js Nginx configuration
        uses: appleboy/scp-action@v1
        with:
          host: ${{ secrets.EC2_HOST }}
          username: ${{ secrets.EC2_USERNAME }}
          key: ${{ secrets.EC2_SSH_KEY }}
          source: 'nginx.vue.conf'
          target: '/tmp/nginx'

      - name: Configure and Restart Nginx
        uses: appleboy/ssh-action@v1.0.3
        with:
          host: ${{ secrets.EC2_HOST }}
          username: ${{ secrets.EC2_USERNAME }}
          key: ${{ secrets.EC2_SSH_KEY }}
          script: |
            # Configure Vue.js nginx
            if [ -f "/tmp/nginx/nginx.vue.conf" ]; then
              sudo mv /tmp/nginx/nginx.vue.conf /etc/nginx/conf.d/nginx.vue.conf
              sudo chown root:root /etc/nginx/conf.d/nginx.vue.conf
              sudo chmod 644 /etc/nginx/conf.d/nginx.vue.conf
            else
              echo "Vue.js Nginx configuration file not found"
              exit 1
            fi

            # Test and restart nginx
            sudo nginx -t
            sudo systemctl restart nginx

            # Set proper permissions for Vue.js app
            sudo chown -R $USER:$USER /var/www/html
            sudo chmod -R 755 /var/www/html
Các lưu ý quan trọng:
Bảo mật:
- Sử dụng AWS KMS để mã hóa dữ liệu nhạy cảm
- Cấu hình AWS WAF cho API Gateway
- Sử dụng AWS Secrets Manager cho credentials
- Thường xuyên cập nhật security patches
- Sử dụng IAM roles thay vì access keys khi có thể
High Availability:
- Cấu hình Auto Scaling Group
- Sử dụng Application Load Balancer
- Cấu hình RDS Multi-AZ
- Implement health checks
- Sử dụng multiple availability zones
Cost Optimization:
- Sử dụng Reserved Instances
- Cấu hình Auto Scaling dựa trên CloudWatch metrics
- Tối ưu hóa RDS instance size
- Sử dụng Spot Instances cho non-critical workloads
- Implement proper resource tagging
Performance:
- Sử dụng CloudFront cho static assets
- Cấu hình Redis cache
- Tối ưu hóa database queries
- Implement CDN caching
- Sử dụng compression cho static assets
Kết luận
Việc triển khai ứng dụng lên AWS đòi hỏi sự hiểu biết về nhiều công nghệ và dịch vụ khác nhau. Tuy nhiên, với hướng dẫn chi tiết này, bạn có thể tự tin triển khai ứng dụng của mình một cách an toàn và hiệu quả. Hãy nhớ luôn theo dõi và tối ưu hóa hệ thống dựa trên metrics và feedback từ người dùng.
Để có thể triển khai thành công, bạn cần:
- Tài khoản AWS với đầy đủ các quyền cần thiết
- Domain name đã đăng ký
- GitHub repository cho code
- Kiến thức về:
- Terraform
- AWS Services
- Nginx
- Golang
- VueJS/Quasar
- CI/CD với GitHub Actions
Bạn có thể tham khảo thêm các tài liệu:
Bình luận