Ngoài RabbitMQ thì ActiveMQ cũng là một trong những MQ tương đối tốt, mã nguồn mở, được duy trì bởi tổ chức mã nguồn mở Apache. Ở công ty cũ của mình cũng dùng ActiveMQ do nó đồng bộ công nghệ và ngôn ngữ Java với dự án nên cũng dễ hiểu và duy trì hơn. Trong bài này Dũng sẽ cùng các bạn tìm hiểu ActiveMQ sử dụng cùng với spring boot nhé.
Mô hình hoạt động
Đầu tiên chúng ta hãy tìm hiểu một chút về mô hình hoạt động của ActiveMQ.
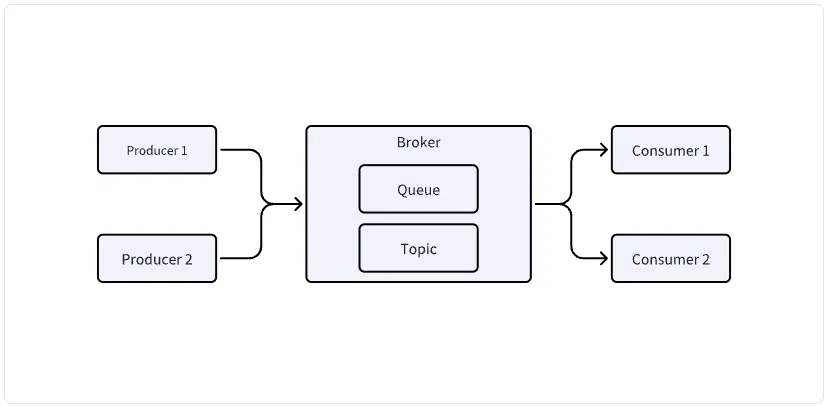
Cũng có phần giống RabbitMQ thì ActiveMQ cũng có các thành phần:
- Publisher: Là các kết nối từ phía các ứng dụng đẩy dữ liệu vào cho ActiveMQ Broker.
- Broker: Là một phần máy chủ nhận và quản lý dữ liệu được đẩy vào từ producer và đẩy dữ liệu về cho các consumer đang đăng ký nhận * message từ các queue hoặc các topic. Kiến trúc phần mềm bên trong broker bao gồm:
- Các queue chứa các message được lưu trữ theo hàng đợi và gửi đến 1 consumer để tiêu thụ.
- Các topic chứa các message sẽ được gửi đến tất cả các consumer đang đăng ký nhận message.
- Consumer: Là các kết nối từ các ứng dụng để nhận và tiêu thụ dữ liệu.
Khởi tạo module
Chúng ta sẽ khởi tạo module có tên spring-boot-activemq.
Chuẩn bị
Để cho đơn giản chúng ta sẽ sử dụng docker để cài đặt RabbitMQ và khởi động nó thông qua các câu lệnh sau:
docker pull apache/activemq-classic
docker run --name=activemq -p 61616:61616 -p 8161:8161 -d apache/activemq-classic:latest
Một ActiveMQ server sẽ được khởi tạo và expose cổng 61616 cho broker và 8161 cho admin.
Lưu ý rằng chúng ta đang sử dụng cho mục đích học tập nên sử dụng docker với ActiveMQ, trong môi trường dự án thực tế có thể ActiveMQ sẽ được cài theo một cách khác sử dụng vps hoặc máy chủ riêng biệt.
Cấu hình dự án
Chúng ta sẽ cần thay đổi tập tin spring-boot-activemq/pom.xml với mã nguồn như sau:
<?xml version="1.0" encoding="UTF-8"?>
<project xmlns="http://maven.apache.org/POM/4.0.0"
         xmlns:xsi="http://www.w3.org/2001/XMLSchema-instance"
         xsi:schemaLocation="http://maven.apache.org/POM/4.0.0 http://maven.apache.org/xsd/maven-4.0.0.xsd">
    <modelVersion>4.0.0</modelVersion>
    <parent>
        <groupId>vn.techmaster</groupId>
        <artifactId>mastering-spring-boot</artifactId>
        <version>1.0.0</version>
    </parent>

    <artifactId>spring-boot-activemq</artifactId>

    <dependencyManagement>
        <dependencies>
            <dependency>
                <groupId>org.springframework.boot</groupId>
                <artifactId>spring-boot-dependencies</artifactId>
                <version>${spring.boot.version}</version>
                <type>pom</type>
                <scope>import</scope>
            </dependency>
        </dependencies>
    </dependencyManagement>

    <dependencies>
        <dependency>
            <groupId>org.springframework.boot</groupId>
            <artifactId>spring-boot-starter-activemq</artifactId>
        </dependency>
        <dependency>
            <groupId>org.apache.activemq</groupId>
            <artifactId>activemq-broker</artifactId>
        </dependency>
    </dependencies>

</project>
Ở đây chúng bổ sung thư viện spring-boot-starter-activemq để có thể sử dụng các thành phần liên quan đến rabbitmq client.
Cấu hình
Khác biệt một chút với RabbitMQ thì spring đã tự động cấu hình giúp chúng ta cho ActiveMQ, chúng ta chỉ cần khai báo tập tin cấu hình application.properties là xong.
spring.activemq.broker-url=tcp://localhost:61616
spring.activemq.user=admin
spring.activemq.password=admin
spring.activemq.in-memory=true
Tạo một producer
Tiếp theo chúng ta có thể tạo ra một lớp chuyên để gửi dữ liệu thế này:
package vn.techmaster.activemq.producer;

import lombok.AllArgsConstructor;
import org.springframework.jms.core.JmsTemplate;
import org.springframework.stereotype.Component;

@Component
@AllArgsConstructor
public class ActiveMQProducer {

    private final JmsTemplate jmsTemplate;

    public void sendMessage(String destination, String message) {
        jmsTemplate.convertAndSend(destination, message);
    }
}
Nó sẽ gửi dữ liệu đến một destination (có thể là queue hoặc topic) sau đó ActiveMQ broker sẽ tự phân bổ đến topic hoặc queue tương ứng.
Tạo một consumer
Để có thể tiêu thụ và giải phóng message khỏi queue chúng ta có thể tạo ra một lớp để tiêu thụ dữ liệu cho queue như sau:
package vn.techmaster.activemq.consumer;

import org.springframework.jms.annotation.JmsListener;
import org.springframework.stereotype.Component;

@Component
public class ActiveMQQueueConsumer {

    @JmsListener(destination = "test-queue")
    public void receiveMessage(String message) {
        System.out.println("Received queue message: " + message);
    }
}
Hoặc một lớp tiêu thụ message từ topic như sau:
package vn.techmaster.activemq.consumer;

import org.springframework.jms.annotation.JmsListener;
import org.springframework.stereotype.Component;

@Component
public class ActiveMQTopicConsumer {

    @JmsListener(destination = "test-topic")
    public void receiveMessage(String message) {
        System.out.println("Received topic message: " + message);
    }
}
Khởi chạy chương trình
Để khởi chạy chương trình chúng ta sẽ cần tạo ra lớp SpringBootActiveMQStartUp với mã nguồn như sau:
package vn.techmaster.activemq;

import org.springframework.boot.SpringApplication;
import org.springframework.boot.autoconfigure.SpringBootApplication;
import org.springframework.context.ApplicationContext;
import vn.techmaster.activemq.producer.ActiveMQProducer;

@SpringBootApplication
public class SpringBootActiveMQStartUp {

    public static void main(String[] args) {
        ApplicationContext applicationContext = SpringApplication
            .run(SpringBootActiveMQStartUp.class);
        ActiveMQProducer messageProducer = applicationContext
            .getBean(ActiveMQProducer.class);
        messageProducer.sendMessage("test-queue", "Hello Techmaster");
        messageProducer.sendMessage("test-topic", "Hello Techmaster");
    }
}
Ở đây chúng ta lấy ra đối tượng messageProducer để gửi đến AcitveMQ broker dữ liệu “Hello Techmaster” cho cả queue test-queue và topic test-topic.
Các consumer sẽ nhận được message từ queue và tiến hành xử lý. kết quả chúng ta nhận được là:
// bỏ qua các log trước đó
Received queue message: Hello Techmaster
Received topic message: Hello Techmaster
Tổng kết
Như vậy chúng ta đã cùng nhau tìm hiểu spring boot activemq, tìm hiểu cách để tạo ra producer, consumer và chạy thử thành công chương trình.
Cám ơn bạn đã quan tâm đến bài viết|video này. Để nhận được thêm các kiến thức bổ ích bạn có thể:
- Đọc các bài viết của TechMaster trên facebook: https://www.facebook.com/techmastervn
- Xem các video của TechMaster qua Youtube: https://www.youtube.com/@TechMasterVietnam nếu bạn thấy video/bài viết hay bạn có thể theo dõi kênh của TechMaster để nhận được thông báo về các video mới nhất nhé.
- Chat với techmaster qua Discord: https://discord.gg/yQjRTFXb7a
Bình luận