Ở bài trước "Có bao nhiêu cách để đóng gói ứng dụng web Spring Boot ? - How many ways to dockerize a Spring Boot app?", tôi đã trình bày cách làm thủ công từng bước:
- Biên dịch ra file *.jar
- Tạo Dockerfile
- Chạy lệnh
docker buildđể tạo ra Docker image
Trong bài này tôi trình bày cách đơn giản hơn sử dụng thư viện GoogleContainerTools/jib.
Link tải mã nguồn sử dụng https://downgit.github.io/ để tải về đúng thư mục cần thiết trong git
Cấu hình Maven pom.xml
Bổ xung thư viện com.google.cloud.tools.jib-maven-plugin vào mục <build><plugins> có nghĩa thư viện này chỉ chạy trong quá trình biên dịch, đóng gói chứ không là thư viên tích hợp vào mã nguồn.
<build>
  <plugins>
    <plugin>
      <groupId>com.google.cloud.tools</groupId>
      <artifactId>jib-maven-plugin</artifactId>
      <version>3.0.0</version>
      <configuration>
        <from>
          <image>openjdk:17-jdk-alpine3.13</image>
        </from>
        <to>
          <image>minhcuong/webdocker</image>
        </to>
        <container>
          <creationTime>USE_CURRENT_TIMESTAMP</creationTime>
        </container>
      </configuration>
    </plugin>
  </plugins>
</build>
Giải thích ý nghĩa của từng thẻ XML một nhé:
from - image
Xác định base docker image cho docker image sẽ kế thừa. Tôi dùng openjdk:17-jdk-alpine3.13 có nghĩa là tên docker image là openjdk, còn tag là 17-jdk-alpine3.13. Được hiểu là phiên bản JDK 17, trên hệ điều hành Alpine Linux 3.13. Tôi chọn Alpine Linux thay cho Ubuntu hay Debian vì kích thước của Alpine rất nhỏ gọn
<from>
  <image>openjdk:17-jdk-alpine3.13</image>
</from>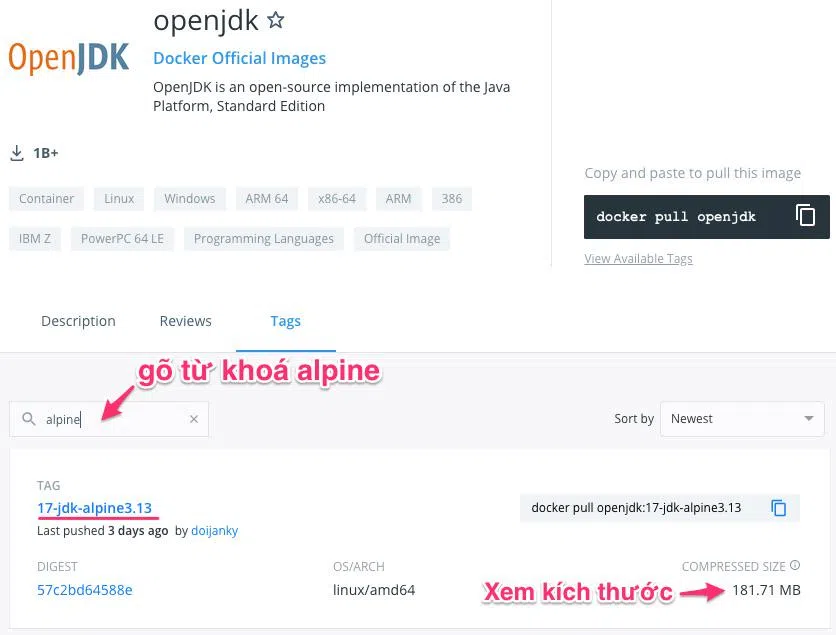
to - image
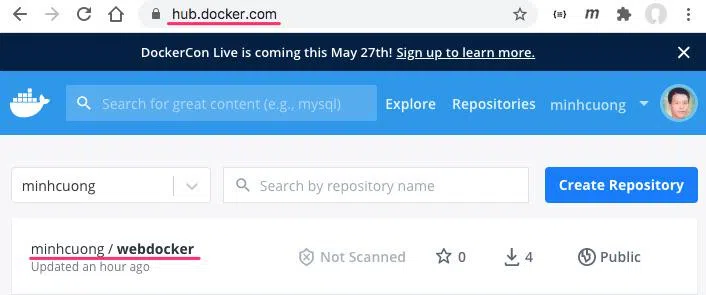
Đặt tên Docker image sẽ xuất ra. Ở đây là minhcuong/webdocker bởi vì tài khoản của tôi trên Docker hub là https://hub.docker.com/u/minhcuong. Tôi muốn khi chạy lệnh build, Docker image sẽ được đẩy (push) lên dịch vụ Container Image Registry ở trường hợp này là https://hub.docker.com/
<to>
  <image>minhcuong/webdocker</image>
</to>
container - creationTime
Thẻ này sẽ đánh dấu lấy thời điểm hiện tại gán vào thẻ creationTime của Docker Image.
<container>
  <creationTime>USE_CURRENT_TIMESTAMP</creationTime>
</container>
Build Docker image rồi đăng ký local Docker Daemon
Lựa chọn dễ nhất là xây dựng Docker image rồi lưu image đó trên máy cục bộ. Để làm điều này, bạn cần bật Docker Daemon lên, nó đóng vai trò docker image registry trên máy tính cục bộ. Lệnh build sẽ là
$ mvn compile jib:dockerBuildBạn sẽ thấy thông tin kiểu như sau xuất ra terminal trong quá trình build
[INFO]
[INFO] ------------------------------------------------------------------------
[INFO] BUILD SUCCESS
[INFO] ------------------------------------------------------------------------
[INFO] Total time: 35.901 s
[INFO] Finished at: 2021-04-18T10:09:51+07:00
[INFO] ------------------------------------------------------------------------
…/webdocker main mvn compile jib:dockerBuild[INFO] Scanning for projects...[INFO]
[INFO] ----------------------< vn.techmaster:webdocker >-----------------------
[INFO] Building webdocker 0.1
[INFO] --------------------------------[ jar ]---------------------------------
[INFO]
[INFO] --- maven-resources-plugin:3.2.0:resources (default-resources) @ webdocker ---
[INFO] Using 'UTF-8' encoding to copy filtered resources.
[INFO] Using 'UTF-8' encoding to copy filtered properties files.
[INFO] Copying 1 resource
[INFO] Copying 2 resources
[INFO]
[INFO] --- maven-compiler-plugin:3.8.1:compile (default-compile) @ webdocker ---
[INFO] Nothing to compile - all classes are up to date
[INFO]
[INFO] --- jib-maven-plugin:3.0.0:dockerBuild (default-cli) @ webdocker ---
[WARNING] 'mainClass' configured in 'maven-jar-plugin' is not a valid Java class: ${start-class}
[WARNING] Setting image creation time to current time; your image may not be reproducible.
[INFO]
[INFO] Containerizing application to Docker daemon as minhcuong/webdocker...
[INFO] Using credentials from Docker config (/Users/techmaster/.docker/config.json) for openjdk:17-jdk-alpine3.13
[INFO] Using base image with digest: sha256:7ee07585addded886cfea377f2ff6d03c707509ef2426b70bd6e1d4e8a3fc7e0]
[INFO]
[INFO] Container entrypoint set to [java, -cp, /app/resources:/app/classes:/app/libs/*, vn.techmaster.webdocker.WebdockerApplication]
[INFO]
[INFO] Built image to Docker daemon as minhcuong/webdocker
[INFO] Executing tasks:
[INFO] [==============================] 100.0% complete
[INFO]
[INFO] ------------------------------------------------------------------------
[INFO] BUILD SUCCESS
[INFO] ------------------------------------------------------------------------
[INFO] Total time: 15.438 s
[INFO] Finished at: 2021-04-18T10:49:14+07:00
[INFO] ------------------------------------------------------------------------Khi tạo Docker Image thành công, hãy gõ lệnh (chú ý chỉ gõ dòng bắt đầu $, các dòng còn lại là kết quả terminal in ra)
$ docker images minhcuong/webdocker:latest
REPOSITORY            TAG                 IMAGE ID            CREATED             SIZE
minhcuong/webdocker   latest              f38e7d48703a        4 minutes ago       344MB
Tiếp đến tạo Docker container
$ docker run -d -p 7000:8080 --name webdocker minhcuong/webdocker:latestTrong lệnh này tôi đã nối từ cổng 7000 bên ngoài vào cổng 8080 của container có tên là webdocker. Vậy mở trình duyệt và vào địa chỉ http://localhost:7000 bạn sẽ thấy web site Spring Boot phục vụ
Builder Docker image push lên Container Image registry
Cách thứ hai là tạo Docker image xong, đẩy lên container image registry trên Internet.
$ mvn compile jib:build
Bình luận