Hey!!! Có bao giờ các bạn lỡ hẹn vì đi lạc một vài địa điểm do không biết đường chưa 😧.Thật buồn chán phải không ? Hôm nay mình sẽ hướng dẫn các bạn làm một ứng dụng lưu trữ thông tin địa điểm có sử dụng thư viện UI MapKit với Swift. Ứng dụng là ứng dụng thứ 4 trong chuỗi 30 ứng dụng di động ToDo đơn giản được lập trình bởi gu
Nào bây giờ hãy xem ứng dụng này có những gì :

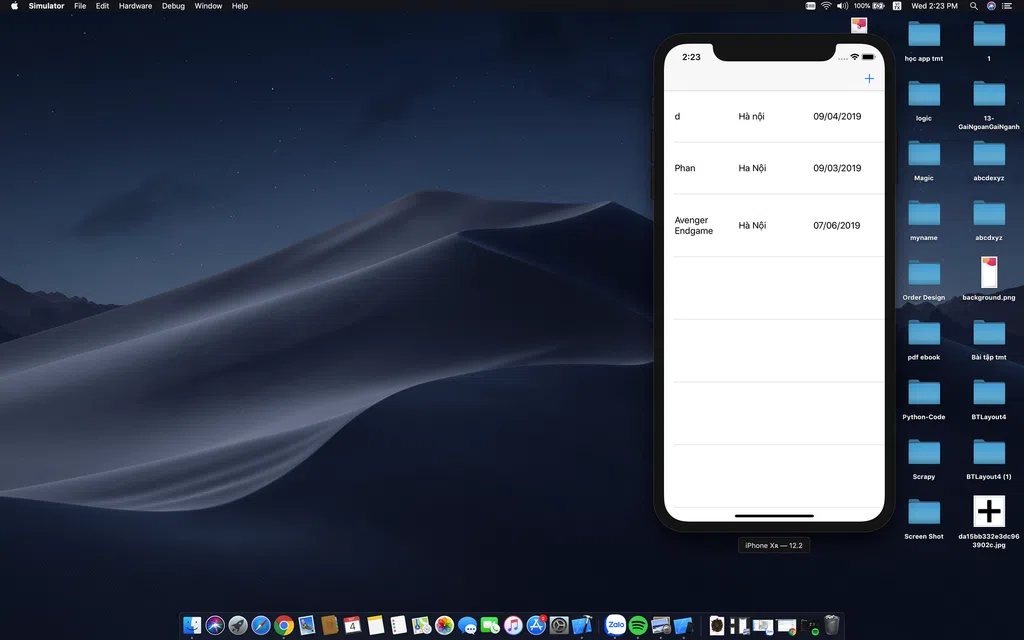
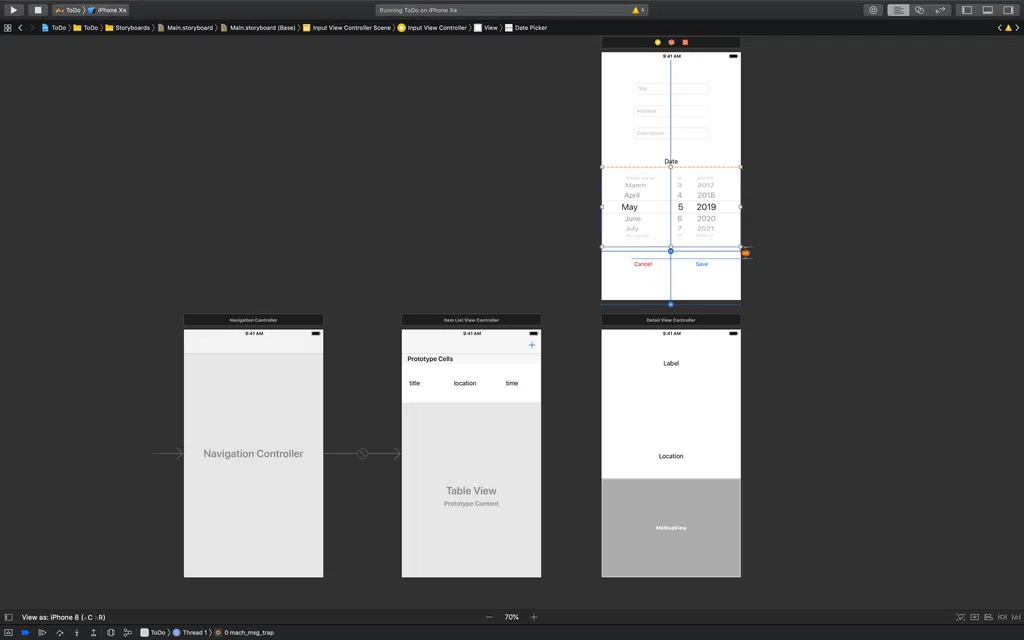
Ứng dụng này bao gồm 3 của sổ : Một cửa sổ update thông tin(Input ViewController), một của sổ lưu trữ thông tin(Item List ViewController ) cuối cùng là một cửa sổ bao gồm thông tin và bản đồ sau khi bạn đã lưu trữ lại(DetailView Controller) . Đầu tiên hãy tạo ra 1 Nagivation Controller và 3 viewcontroller như trên. Ở nagivation controller hãy thêm 1 thanh Navigation controller bar tiếp theo hãy kéo Item List ViewController từ Nagivation controller bằng cách chọn " Editor → Embed In → Navigation Controller " xóa trình điều khiển xem khỏi ViewController và kéo trình điều khiển điều hướng đến View. Điều này cũng sẽ thêm trình điều khiển xem bảng . Bấm đúp vào Thanh tiêu đề trong trình điều khiển xem bảng và chèn Transportation . Chọn bộ điều khiển điều hướng và đi đến trình kiểm tra thuộc tính. Trong phần xem trình điều khiển, hãy chọn "Is Initial View Controller"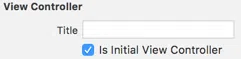
Ta hãy thêm chức năng cho Item List ViewController : • Ở thanh navigation bar kéothả UI Bar Button Item chọn style là ADD
• Thêm UI Table view đặt chế độ toàn màn hình
• Ở mỗi view thêm 3 thuộc tính UI Label : Title( chức danh ) , Location ( vị trí ), Descripson( miêu tả )
Tiếp theo là Input ViewController : • Đặt 3 UI Text Field (layout và đặt 3 thuộc tính Title , Location,Descirpson)
• Thêm 1 date picker và 2 UI Button (cancel , save)
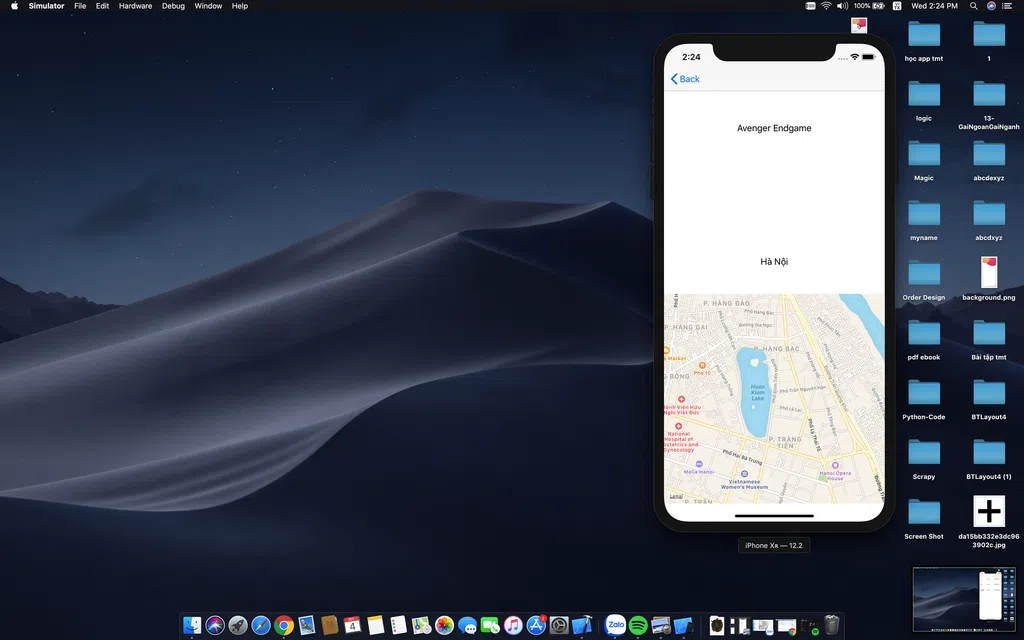
Cuối cùng là Detail ViewController : • Thêm 1 MK MapView và 2 label (Title , location) sau khi thêm các thuộc tính bạn sẽ được như thế này !
Ở đây ban đầu tôi kéo 3 thuộc tính UILabel từ view sau đó tôi đã khai báo 1 biến Lazy Var và nó được sử dụng khi nhắc tới ,để hiểu rõ hơn các bạn hãy xem ở đây https://techmaster.vn/posts/35274/lazy-var-trong-ios-swift và thêm chức năng thay đổi 3 thuộc tính trong cell
class ItemCell: UITableViewCell {

    @IBOutlet weak var titleLabel: UILabel!
    @IBOutlet weak var locationLabel: UILabel!
    @IBOutlet weak var dateLabel: UILabel!

    lazy var dateFormatter: DateFormatter = {
        let dateFormatter = DateFormatter()
        dateFormatter.dateFormat = "MM/dd/yyyy"
        return dateFormatter
    }()

    override func awakeFromNib() {
        super.awakeFromNib()
        // Initialization code
    }

    override func setSelected(_ selected: Bool, animated: Bool) {
        super.setSelected(selected, animated: animated)
    }

    func configCell(with item: ToDoItem, isChecked: Bool = false) {
        if isChecked {
            let attributedString = NSAttributedString(string: item.title, attributes: [NSAttributedString.Key.strikethroughStyle: NSUnderlineStyle.single.rawValue])

            titleLabel.attributedText = attributedString
            dateLabel.text = nil
            locationLabel.text = nil
        } else {
            titleLabel.text = item.title

            if let timestamp = item.timestamp {
                let date = Date(timeIntervalSince1970: timestamp)
                dateLabel.text = dateFormatter.string(from: date)
            }

            if let location = item.location {
                locationLabel.text = location.name
            }
        }
    }

}
Sau đó hãy tạo 1 file ViewController bao gồm các phần code cài đặt cho 3 cửa sổ làm việc chính và 1 phần code cho thông tin lưu trữ (Item List Data) .Bắt đầu với Item List ViewController đã được thêm tính năng hiện các thông tin cá nhân và chuyển qua cửa sổ kế tiếp
class ItemListViewController: UIViewController {

  @IBOutlet var tableView: UITableView!
  @IBOutlet var dataProvider: ItemListDataProvider!

  override func viewDidLoad() {
    super.viewDidLoad()

    tableView.dataSource = dataProvider
    tableView.delegate = dataProvider

    dataProvider.itemManager = ToDoItemManager()

    NotificationCenter.default.addObserver(self, selector: #selector(showDetails(_:)), name: Notification.ItemSelectedNotification,
      object: nil)
  }

  override func viewWillAppear(_ animated: Bool) {
    super.viewWillAppear(animated)

    tableView.reloadData()
  }

  @objc func showDetails(_ sender: Notification) {
    guard let index = sender.userInfo?["index"] as? Int else {
      fatalError()
    }

    if let nextViewController = storyboard?.instantiateViewController(withIdentifier: Constants.DetailViewControllerIdentifier) as? DetailViewController,
      let itemManager = dataProvider.itemManager {

      guard index < itemManager.toDoCount else {
        return
      }

      nextViewController.item = itemManager.item(at: index)

      navigationController?.pushViewController(nextViewController, animated: true)
    }
  }

  @IBAction func addItem(_ sender: UIBarButtonItem) {
    guard let inputViewController = storyboard?.instantiateViewController(withIdentifier: "InputViewController") as? InputViewController else {
      return
    }
    inputViewController.itemManager = dataProvider.itemManager

    present(inputViewController, animated: true, completion: nil)
  }
}
Tiếp tục ta sẽ khai báo các dữ liệu ở file Item List Data
enum Section: Int {
  case toDo
  case done
}

class ItemListDataProvider: NSObject {
  var itemManager: ToDoItemManager?
}

extension ItemListDataProvider: UITableViewDataSource {
  func numberOfSections(in tableView: UITableView) -> Int {
    return 2
  }

  func tableView(_ tableView: UITableView, numberOfRowsInSection section: Int) -> Int {
    guard let itemManager = itemManager else {
      return 0
    }
    guard let itemSection = Section(rawValue: section) else {
      fatalError()
    }

    let numberOfRows: Int

    switch itemSection {
    case .toDo:
      numberOfRows = itemManager.toDoCount
    case .done:
      numberOfRows = itemManager.doneCount
    }

    return numberOfRows
  }

  func tableView(_ tableView: UITableView, cellForRowAt indexPath: IndexPath) -> UITableViewCell {
    let cell = tableView.dequeueReusableCell(withIdentifier: Constants.ItemCellIdentifier, for: indexPath) as! ItemCell

    guard let itemManager = itemManager else {
      fatalError()
    }
    guard let itemSection = Section(rawValue: indexPath.section) else {
      fatalError()
    }

    let item: ToDoItem

    switch itemSection {
    case .toDo:
      item = itemManager.item(at: indexPath.row)
    case .done:
      item = itemManager.doneItem(at: indexPath.row)
    }

    cell.configCell(with: item)

    return cell
  }
}

extension ItemListDataProvider: UITableViewDelegate {
  func tableView(_ tableView: UITableView, titleForDeleteConfirmationButtonForRowAt indexPath: IndexPath) -> String? {

    guard let itemSection = Section(rawValue: indexPath.section) else {
      fatalError()
    }

    let deleteTitle: String

    switch itemSection {
    case .toDo:
      deleteTitle = "Check"
    case .done:
      deleteTitle = "Uncheck"
    }

    return deleteTitle
  }

  func tableView(_ tableView: UITableView, commit editingStyle: UITableViewCell.EditingStyle, forRowAt indexPath: IndexPath) {

    guard let itemSection = Section(rawValue: indexPath.section) else {
      fatalError()
    }

    switch itemSection {
    case .toDo:
      itemManager?.checkItem(at: indexPath.row)
    case .done:
      itemManager?.uncheckItem(at: indexPath.row)
    }

    tableView.reloadData()
  }

  func tableView(_ tableView: UITableView, didSelectRowAt indexPath: IndexPath) {
    guard let itemSection = Section(rawValue: indexPath.section) else {
      fatalError()
    }

    switch itemSection {
    case .toDo:
      NotificationCenter.default.post(
        name: Notification.ItemSelectedNotification,
        object: self,
        userInfo: ["index": indexPath.row])
    case .done:
      break
    }
  }
}
Và bây giờ bắt đầu sử dụng UI MapKit ,bằng cách thêm thư viện Mapkit biến location giờ đây đã được check tương ứng với vị trí bạn gọi trên Map rồi 🌐
import MapKit

class DetailViewController: UIViewController {

  @IBOutlet var titleLabel: UILabel!
  @IBOutlet var mapView: MKMapView!
  @IBOutlet var locationLabel: UILabel!

  var item: ToDoItem?

  override func viewDidLoad() {
    super.viewDidLoad()

    guard let item = item else {
      return
    }

    titleLabel.text = item.title

    if let location = item.location {
      locationLabel.text = location.name
      if let cooridnate = location.coordinate {
        centerMapOnLocation(with: cooridnate)
      }
    }
  }

  private func centerMapOnLocation(with coordinate: CLLocationCoordinate2D) {
    let regionRadius: CLLocationDistance = 1000

    let coordinateRegion = MKCoordinateRegion(center: coordinate, latitudinalMeters: regionRadius, longitudinalMeters: regionRadius)
    mapView.setRegion(coordinateRegion, animated: true)
  }
}
Để sử dụng các biến vừa được gọi tôi cần phải gọi chúng ở file InputViewController :
import CoreLocation

class InputViewController: UIViewController {

  @IBOutlet var titleTextField: UITextField!
  @IBOutlet var locationTextField: UITextField!
  @IBOutlet var descriptionTextField: UITextField!
  @IBOutlet var datePicker: UIDatePicker!
  @IBOutlet var cancelButton: UIButton!
  @IBOutlet var saveButton: UIButton!

  lazy var geocoder = CLGeocoder()
  var itemManager: ToDoItemManager?

  override func viewDidLoad() {
    super.viewDidLoad()

    titleTextField.delegate = self
    locationTextField.delegate = self
    descriptionTextField.delegate = self
  }

  override func touchesBegan(_ touches: Set, with event: UIEvent?) {
    view.endEditing(true)
  }

  @IBAction func save() {
    guard let titleString = titleTextField.text,
      titleString.count > 0 else {
        return
    }

    // datePicker could be nil if the view controller is init via code
    var date: Date?
    if datePicker != nil {
      date = datePicker.date
    }

    // descriptionTextField could be nil if the view controller is init via code
    var descriptionString: String?
    if descriptionTextField != nil {
      descriptionString = descriptionTextField.text
    }

    // locationTextField could be nil if the view controller is init via code
    var placeMark: CLPlacemark?
    var locationName: String?

    if locationTextField != nil {
      locationName = locationTextField.text
      if let locationName = locationName, locationName.count > 0 {
        geocoder.geocodeAddressString(locationName) { [weak self] placeMarks, _ in
          placeMark = placeMarks?.first

          let item = ToDoItem(title: titleString,
                              itemDescription: descriptionString,
                              timeStamp: date?.timeIntervalSince1970,
                              location: Location(name: locationName, coordinate: placeMark?.location?.coordinate))

          DispatchQueue.main.async {
            self?.itemManager?.add(item)
            self?.dismiss(animated: true)
          }
        }
      } else {
        let item = ToDoItem(title: titleString,
                            itemDescription: descriptionString,
                            timeStamp: date?.timeIntervalSince1970,
                            location: nil)
        self.itemManager?.add(item)
        dismiss(animated: true)
      }
    } else {
      let item = ToDoItem(
        title: titleString,
        itemDescription: descriptionString,
        timeStamp: date?.timeIntervalSince1970)

      self.itemManager?.add(item)
      dismiss(animated: true)
    }
  }

  @IBAction func cancel() {
    dismiss(animated: true, completion: nil)
  }
}

extension InputViewController: UITextFieldDelegate {
  func textFieldShouldReturn(_ textField: UITextField) -> Bool {
    resignFirstResponder()
    view.endEditing(true)
    return false
  }
}
Như bạn thấy ở đây các biến location hay timeStamp đã được gọi như những khối riêng biệt và mọi thứ đã được khởi tạo nếu như bạn đã thêm 1 file để sử dụng Map
import CoreLocation

struct Location {
  let name: String
  let coordinate: CLLocationCoordinate2D?

  // plist
  private let nameKey = "nameKey"
  private let latitudeKey = "latitudeKey"
  private let longitudeKey = "longitudeKey"

  var plistDict: [String:Any] {
    var dict = [String:Any]()

    dict[nameKey] = name
    if let coordinate = coordinate {
      dict[latitudeKey] = coordinate.latitude
      dict[longitudeKey] = coordinate.longitude
    }

    return dict
  }

  init(name: String, coordinate: CLLocationCoordinate2D? = nil) {
    self.name = name
    self.coordinate = coordinate
  }

  init?(dict: [String: Any]) {
    guard let name = dict[nameKey] as? String else {
      return nil
    }

    let coordinate: CLLocationCoordinate2D?
    if let latitude = dict[latitudeKey] as? Double,
      let longitude = dict[longitudeKey] as? Double {
      coordinate = CLLocationCoordinate2DMake(latitude, longitude)
    } else {
      coordinate = nil
    }

    self.name = name
    self.coordinate = coordinate
  }
}

extension Location: Equatable {
  static func ==(lhs: Location, rhs: Location) -> Bool {
    return lhs.name == rhs.name && lhs.coordinate?.latitude == rhs.coordinate?.latitude && lhs.coordinate?.longitude == rhs.coordinate?.longitude
  }
}
Chúc các bạn thành công !!!
Bình luận