Tiếp theo phần 1, ở phần 2 này chúng ta sẽ hoàn thiện nốt một vài vấn đề như sau:
- Xóa một nhật ký với thao tác trượt để xóa
- Ẩn bàn phím khi ấn Enter
- Tự tính toán cell để chứa nhiều text hơn.
- Đưa những bài viết mới nhất lên đầu.
- Thêm thời gian viết của mỗi bài.
Xóa bài viết
Để xóa một bài viết, chúng ta sử dụng một method có sẵn mà Apple cung cấp cho UITableView như sau:
override func tableView(_ tableView: UITableView, editActionsForRowAt indexPath: IndexPath) -> [UITableViewRowAction]? {

}
Chúng ta cần trả về một array những UITableViewRowAction
override func tableView(_ tableView: UITableView, editActionsForRowAt indexPath: IndexPath) -> [UITableViewRowAction]? {

    let delete = UITableViewRowAction(style: .default, title: "Delete") { (action, indexPath) in
        // delete item at indexPath
        let item = self.items[indexPath.row]
        self.context.delete(item)
        (UIApplication.shared.delegate as! AppDelegate).saveContext()

        self.items.remove(at: indexPath.row)
        tableView.deleteRows(at: [indexPath], with: .fade)

    }

    let share = UITableViewRowAction(style: .default, title: "Share") { (action, indexPath) in
        // share item at indexPath
        print("Share")

    }

    return [delete,share]

}
Ẩn bàn phím
Nếu bạn để ý ở trong phần 1, bàn phím không tự động ẩn sau khi người dùng ấn nút Return, chúng ta sẽ cùng nhau fix lỗi này. Tại class:
class addItemViewController: UIViewController, UITextViewDelegate {
...
Bạn cần để class addItemViewController conform UITextViewDelegate protocol. Sau đó tại method viewDidLoad chúng ta set delegate cho chính class này.
override func viewDidLoad() {
  super.viewDidLoad()
  itemEntryTextView?.delegate = self
}
func textView(_ textView: UITextView, shouldChangeTextIn range: NSRange, replacementText text: String) -> Bool {
    if (text == "\n") {
        textView.resignFirstResponder()
        return false
    }
    return true
}
Self-sizing cells
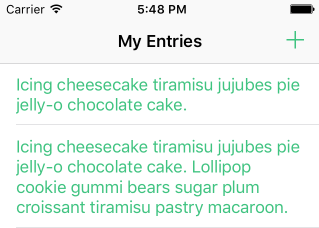
Ở phần 1, bạn có để ý rằng nếu đoạn text của chúng ta quá dài thì sẽ bị cắt gọn thành các dấu..không?. Trông sẽ không đẹp, cái mà chúng ta muốn là như thế này:
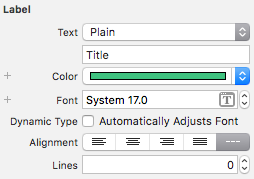
Đầu tiên chúng ta vào trong storyboard, chọn title Label và set number of lines thành 0.
Sau đó tại viewDidLoad, chúng ta set estimatedRowHeight và rowHeight thành UITableViewAutomaticDimension.
self.tableView.estimatedRowHeight = 44
self.tableView.rowHeight = UITableViewAutomaticDimension
Đặt bài mới nhất lên top
Rất đơn giản, chúng ta chỉ cần gọi method reverse() như sau:
cell.textLabel?.text = items.reversed()[indexPath.row].name
Hiển thị thời gian viết của mỗi bài
Đầu tiên chúng ta quay lại file .xcdatamodelId và thêm 2 attributes nữa là date, time với kiểu String. Sau đó mở file swift mà bạn lưu entry vào và thêm đoạn code sau vào khối ệnh if-else:
else {

  let date = Date()
  let formatter = DateFormatter()
  formatter.dateFormat = "MM/dd/YY"
  let currentDate = formatter.string(from: date)

  let timeFormatter = DateFormatter()
  timeFormatter.timeStyle = .short
  let currentTime = timeFormatter.string(from: date)
...
Sau đó chúng ta save chúng lại:
...
let context = (UIApplication.shared.delegate as! AppDelegate).persistentContainer.viewContext
let newEntry = Item(context: context)
newEntry.name = entryText
newEntry.date = currentDate
newEntry.time = currentTime
...
Để hiển thị, chúng ta quay lại tableView:
override func tableView(_ tableView: UITableView, cellForRowAt indexPath: IndexPath) -> UITableViewCell {
let cell = tableView.dequeueReusableCell(withIdentifier: "Cell", for: indexPath) as UITableViewCell
let date = items.reversed()[indexPath.row].date
let time = items.reversed()[indexPath.row].time
cell.textLabel?.text = items.reversed()[indexPath.row].name
if let date = date, let time = time {
let timeStamp = "Added on \(date) at \(time)"
cell.detailTextLabel?.text = timeStamp
}
return cell
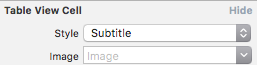
}Ở trong file storyboard, chúng ta đổi cell style thành Subtitle:
Như vậy là chúng ta đã hoàn thành ứng dụng viết nhật ký đơn giản bằng Core Data rồi đó.
Bình luận