Sau khi khởi tạo và cấu hình xong dự án ReactJS giờ là lúc chúng ta có thể tạo ra màn hình login để cho phép người dùng đăng nhập vào ứng dụng chat của chúng ta. Trong bài này Dũng sẽ cùng các bạn tạo giao diện cho màn hình login nhé.
Chuẩn bị
Bạn hãy tải ảnh nền login.jpg cho màn hình login từ git repo của freechat và lưu vào thư mục freechat/reactjs/src/images/bg.
Tạo mã Javascript
Chúng ta sẽ cần tạo mã nguồn cho giao diện bằng cách tạo ra một tập tin có tên LoginView.jsx trong thư mục reactjs/src/views/LoginView với nội dung như sau:
import * as React from 'react';

class LoginView extends React.Component {
    constructor(props) {
        super(props);
        this.onLogin = this.onLogin.bind(this);
        this.onKeyDown = this.onKeyDown.bind(this);
        this.onUsernameChange = this.onUsernameChange.bind(this);
        this.onPasswordChange = this.onPasswordChange.bind(this);
        this.state = {
            username : "",
            password : ""
        }
    }

    onLogin() {
        this.connection.url = this.state.url;
        this.connection.username = this.state.username;
        this.connection.password = this.state.password;
    }

    onKeyDown(e) {
        if (e.key === 'Enter') {
            this.onLogin();
        }
    }

    onUsernameChange(e) {
        this.setState({username: e.target.value});
    }

    onPasswordChange(e) {
        this.setState({password: e.target.value});
    }

    render() {
        const {username, password} = this.state;
        return (
            <div className="page-login">
                <div className="login-form-wrapper">
                    <div className="login-form">
                        <h1 className="login-form-title">Login to your account </h1>
                        <div className="login-form-body">
                            <div className="input-group mb-3">
                                <span className="input-group-text">
                                    <i className="fa-solid fa-user"></i>
                                </span>
                                <input type="text" className="form-control" placeholder="username"
                                    value={username} onChange={this.onUsernameChange} onKeyDown={this.onKeyDown} />
                            </div>
                            <div className="input-group mb-3">
                                <span className="input-group-text">
                                    <i className="fa-solid fa-lock"></i>
                                </span>
                                <input type="password" className="form-control" placeholder="password"
                                    value={password} onChange={this.onPasswordChange} onKeyDown={this.onKeyDown} />
                            </div>
                            <div className="login-options">
                                <div className="checkbox">
                                    <label>
                                        <input type="checkbox" className="styled" defaultChecked="checked" /> Remember me
                                    </label>
                                </div>
                            </div>
                            <button className="btn btn-info btn-block" onClick={this.onLogin}>Login</button>
                            <div className="text-small">
                                Just login, register automatically!
                            </div>
                        </div>
                    </div>
                </div>
            </div>
       );
    }
 }

 export default LoginView;
Ở đây chúng ta tạo ra một lớp có tên LoginView thừa kế từ React.Component. Đây là một cách để chúng ta tạo ra lớp View trong ReactJS, ngoài ra cũng có một cách nữa để tạo là dùng hàm (function component) kiểu:
import React, { useState, useEffect } from 'react';

function Example() {
  const [count, setCount] = useState(0);

  // Similar to componentDidMount and componentDidUpdate:
  useEffect(() => {
    // Update the document title using the browser API
    document.title = `You clicked ${count} times`;
  });

  return (
    <div>
      <p>You clicked {count} times</p>
      <button onClick={() => setCount(count + 1)}>
        Click me
      </button>
    </div>
  );
}
Nhưng cách này theo cá nhân mình không thực sự tường minh và gây khó hiểu cho người mới bắt đầu vì cảm giác nó quá lạm dụng lambda function.
Quay trở lại với mã nguồn LoginView thì chúng ta sẽ tạo ra một giao diện với một ô nhập tên đăng nhập, một ô nhập mật khẩu, một nút bấm và một checkbox để ghi nhớ thông tin đăng nhập.
Có một điều đặc biệt ở đây là chúng ta thấy sự xuất hiện của rất nhiều hàm onXXX để lắng nghe sự kiện người dùng nhập liệu và lưu vào trạng thái. Đây cũng là một trong những nhược điểm của ReactJS nói riêng hay virtual DOM nói chung khi các thành phần trên giao diện không có sẵn html mà phải đợi các mã javascript thực thi xong thì mới có dẫn điến việc chúng ta rất khó để truy cập đến các thành phần giao diện để lấy được giá trị giống như lập trình html, javascript thông thường.
Tiếp theo chúng ta sẽ tạo ra tập tin reactjs/src/views/LoginView/index.js như sau:
import LoginView from './LoginView'

export default LoginView;
Tập tin này cũng chẳng làm gì nhiều, nó cũng chỉ là cầu nối để sau chúng ta import cho ngắn gọn hơn thôi.
Một lần nữa chúng ta lại tạo ra tập tin cầu nối eactjs/src/views/index.js với nội dung như sau:
import LoginView from "./LoginView/LoginView";

export {
    LoginView
}
Bây giờ chúng ta có thể cập nhật tập tin reactjs/src/App.js như sau:
import React, { Component } from "react";
import { LoginView } from "./views";

class App extends Component {
  constructor() {
    super(...arguments);
  }

  render() {
    return (
        <React.Fragment>
          <LoginView />
        </React.Fragment>
    );
  }
}
export default App;
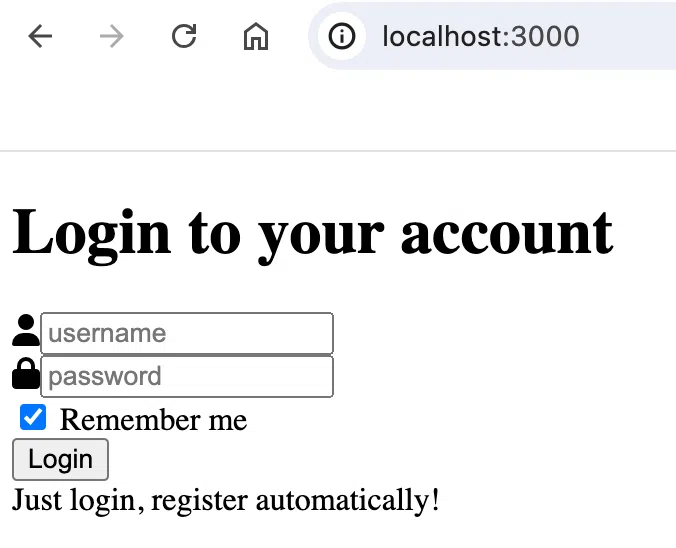
Hãy thử chạy chương trình bằng cách chạy lệnh yarn startchúng ta sẽ thấy một giao diện hiển thị như sau:
Tạo mã scss
Mặc dù đã có giao diện, tuy nhiên chúng ta có thể thấy nó rất thiếu thân thiện với người dùng, vậy nên chúng ta sẽ cần tạo ra các mã css để làm cho giao diện trở nên sinh động hơn, tuy nhiên chúng ta sẽ không dùng trực tiếp css mà sử dụng scss để viết mã css gọn gàng và dễ dàng hơn sau đó công cụ sass sẽ tự biên dịch ra css cho chúng ta.
Đầu tiên chúng ta sẽ tạo ra tập tin reactjs/src/scss/helper/_common.scss chứa các mã nguồn scss dùng chung như sau:
:root {
    --bs-border-width: 1px;
    --bs-body-color: #212529;
    --bs-body-bg: #fff;
    --bs-border-color: #dee2e6;
    --bs-border-radius: 0.375rem;
    --bs-tertiary-bg: #f8f9fa;
}

body {
    padding: 0;
    margin: 0;
}

.avatar {
    border-radius: 50%;
}

.btn {
    display: inline-block;
    font-weight: 400;
    line-height: 1.5;
    color: #212529;
    text-align: center;
    text-decoration: none;
    vertical-align: middle;
    cursor: pointer;
    -webkit-user-select: none;
    -moz-user-select: none;
    user-select: none;
    background-color: transparent;
    border: 1px solid transparent;
    padding: .375rem .75rem;
    font-size: 1rem;
    border-radius: .25rem;
    transition: color .15s ease-in-out, background-color .15s ease-in-out, border-color .15s ease-in-out, box-shadow .15s ease-in-out;
}

.btn-block {
    display: block;
    width: 100%;
}

.btn-close {
    box-sizing: content-box;
    width: 1em;
    height: 1em;
    padding: .25em .25em;
    color: #000;
    background: transparent escape-svg(transparent) center / 1em auto no-repeat;
    border: 0;
    border-radius: .25rem;
    opacity: 0.5;

    &:hover {
      color: #000;
      text-decoration: none;
      opacity: 1;
    }

    &:focus {
      outline: 0;
      box-shadow: 0 0 0 .25rem rgba(13, 110, 253, .25);;
      opacity: 1;
    }
  }

[type=button]:not(:disabled), [type=reset]:not(:disabled), [type=submit]:not(:disabled), button:not(:disabled) {
    cursor: pointer;
}

.btn-icon {
    display: flex;
    gap: 5px;
    align-items: center;
}

.btn-info {
    color: #fff;
    background-color: #17a2b8;
    border-color: #17a2b8;
}

.btn-send {
    color: #fff;
    background-color: #000;
    border-color: #000;
}

.container, .container-fluid, .container-lg, .container-md, .container-sm, .container-xl, .container-xxl {
    width: 100%;
    padding-right: var(--bs-gutter-x, .75rem);
    padding-left: var(--bs-gutter-x, .75rem);
    margin-right: auto;
    margin-left: auto;
}

@media (min-width: 768px) {
    .container, .container-md, .container-sm {
        max-width: 720px;
    }
}

@media (min-width: 576px) {
    .container, .container-sm {
        max-width: 540px;
    }
}

.form-control {
    display: block;
    width: 100%;
    padding: .375rem .75rem;
    font-size: 1rem;
    font-weight: 400;
    line-height: 1.5;
    color: #212529;
    background-color: #fff;
    background-clip: padding-box;
    border: 1px solid #ced4da;
    -webkit-appearance: none;
    -moz-appearance: none;
    appearance: none;
    border-radius: .25rem;
    transition: border-color .15s ease-in-out, box-shadow .15s ease-in-out;
}

.form-control:focus {
    color: var(--bs-body-color);
    background-color: var(--bs-body-bg);
    border-color: #86b7fe;
    outline: 0;
    box-shadow: 0 0 0 .25rem rgba(13, 110, 253, .25);
}

.input-group {
    position: relative;
    display: flex;
    flex-wrap: wrap;
    align-items: stretch;
    width: 100%;
}

.input-group>.form-control, .input-group>.form-floating, .input-group>.form-select {
    position: relative;
    flex: 1 1 auto;
    width: 1%;
    min-width: 0;
}

.input-group>:not(:first-child):not(.dropdown-menu):not(.valid-tooltip):not(.valid-feedback):not(.invalid-tooltip):not(.invalid-feedback) {
    margin-left: calc(var(--bs-border-width)* -1);
    border-top-left-radius: 0;
    border-bottom-left-radius: 0;
}

.input-group:not(.has-validation)>.dropdown-toggle:nth-last-child(n+3), .input-group:not(.has-validation)>.form-floating:not(:last-child)>.form-control, .input-group:not(.has-validation)>.form-floating:not(:last-child)>.form-select, .input-group:not(.has-validation)>:not(:last-child):not(.dropdown-toggle):not(.dropdown-menu):not(.form-floating) {
    border-top-right-radius: 0;
    border-bottom-right-radius: 0;
}

.input-group-text {
    display: flex;
    align-items: center;
    padding: .375rem .75rem;
    font-size: 1rem;
    font-weight: 400;
    line-height: 1.5;
    color: var(--bs-body-color);
    text-align: center;
    white-space: nowrap;
    background-color: var(--bs-tertiary-bg);
    border: var(--bs-border-width) solid var(--bs-border-color);
    border-radius: var(--bs-border-radius);
}

.mb-3 {
    margin-bottom: 1rem !important;
}

.mt-3 {
    margin-top: 1rem !important;
}

.text-small {
    font-size: 14px;
    color: white;
    margin-bottom: 24px;
    text-align: center;
}
Thật khó để mô tả hết tất cả mã nguồn này nhưng cơ bản nó đang tạo ra các lớp cho thẻ input, các nút bấm, các thành phần của form và text.
Tiếp theo chúng ta sẽ cần tạo ra tập tin reactjs/src/scss/pages/_login.scss với mã nguồn như sau:
.page-login {
    background-image: url('../../images/bg/login.jpg');

    .login-form-wrapper {
        height: 100vh;
        width: 100%;
        display: flex;
        justify-content: center;
        align-items: center;

        .login-form {
            width: 90%;

            .login-form-title {
                text-align: center;
                font-size: 24px;
                margin-bottom: 25px;
                font-weight: 700;
                color: #ffffff;
            }

            .login-options {
                .checkbox {
                    label {
                        color: white;
                    }
                }
            }
        }

        @media (min-width: 768px) {
            .login-form {
                width: 400px;
            }
        }
    }
}
Ở đây chúng ta sẽ sử dụng background cho giao diện login là ảnh mà chúng ta đã tạo trước đó. Ngoài ra chúng ta cũng style cho các thành phần của login form.
Tiếp theo chúng ta sẽ tạo ra tập tin reactjs/src/scss/main.scss để tổng hợp hai tập tin scss mà chúng ta đã tạo với mã nguồn như sau:
@import "helper/common";
@import "pages/login";
Và chúng ta cũng không quên cập nhật tập tin App.js để bổ sung main.css vào danh sách phụ thuộc:
import React, { Component } from "react";
import { LoginView } from "./views";
import "./scss/main.scss";

class App extends Component {
  constructor() {
    super(...arguments);
  }

  render() {
    return (
        <React.Fragment>
          <LoginView />
        </React.Fragment>
    );
  }
}
export default App;
Sau khi lưu tất cả thì trình duyệt sẽ tự động reload và chúng ta sẽ nhận được một giao diện mới đẹp hơn rất nhiều như sau:

Tổng kết
Như vậy chúng ta đã cùng nhau khởi tạo màn hình login cho web với ReactJs cho dự án freechat. Phần này tương đối nhiều kiến thức nên bạn hãy xem xét thật cẩn thận nhé.
Cám ơn bạn đã quan tâm đến bài viết này. Để nhận được thêm các kiến thức bổ ích bạn có thể:
- Đọc các bài viết của TechMaster trên facebook: https://www.facebook.com/techmastervn
- Xem các video của TechMaster qua Youtube: https://www.youtube.com/@TechMasterVietnam nếu bạn thấy video/bài viết hay bạn có thể theo dõi kênh của TechMaster để nhận được thông báo về các video mới nhất nhé.
- Chat với techmaster qua Discord: https://discord.gg/yQjRTFXb7a
Bình luận