Tiếp tục với loạt bài về Terraform, trong bài viết này chúng ta chúng ta sẽ xây dựng một Private Subnet hoàn chỉnh.
Để tạo Private Subnet và có thể test được, chúng ta nên tạo một full network như bên dưới:
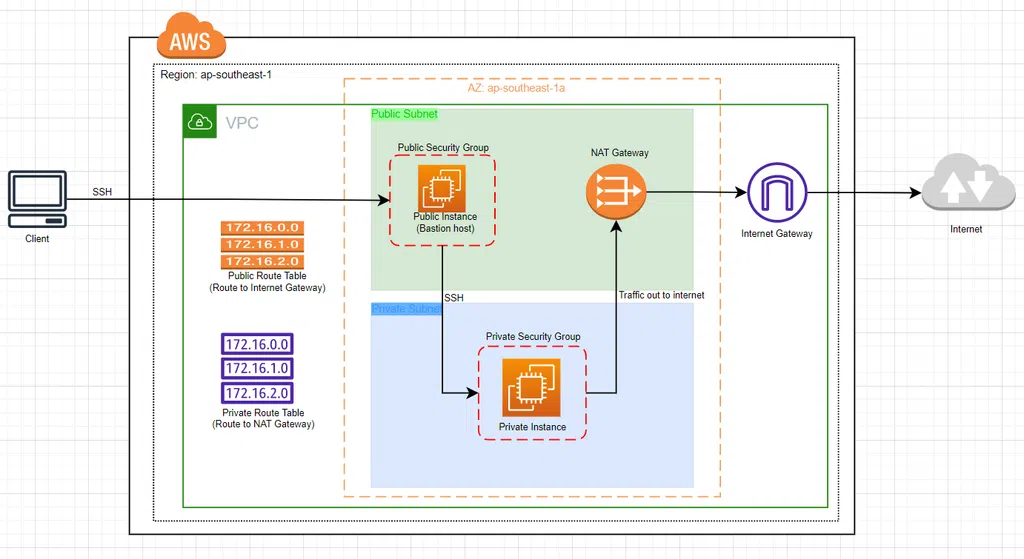
Trong đó chúng ta có:
- 1 VPC
- 1 Public Subnet
- 1 Private Subnet
- 1 Internet Gateway nằm trong VPC, dùng để điều hướng traffic từ VPC ra internet và ngược lại
- 1 NAT Gateway nằm trong Public Subnet dùng để điều hướng traffic từ Private Subnet ra Internet Gateway
- 1 EC2 instance nằm trong Public Subnet dùng để làm bastion host. Chúng ta có thể SSH đến con instance này từ máy local của chúng ta.
- 1 EC2 instance nằm trong Private Subnet. Instance này có thể truy cập internet thông qua NAT Gateway và chỉ có thể được SSH từ bastion host(instance được tạo trong Public Subnet). Tuy nhiên, chúng ta không thể truy cập instance này từ internet hoặc SSH từ máy local của chúng ta.
Tiến hành viết code Terraform để triển khai
- Tạo một mạng VPC
resource "aws_vpc" "my_vpc" { cidr_block = "10.0.0.0/16" enable_dns_hostnames = true tags = { Name = "My VPC" } } - Tạo một Public Subnet nằm trong my_vpc, chú ý subnet này có
map_public_ip_on_launch = true
nghĩa là nó sẽ tự động assign public IP cho những instance được run trong nó.resource "aws_subnet" "public" { vpc_id = aws_vpc.my_vpc.id cidr_block = "10.0.0.0/24" availability_zone = "ap-southeast-1a" map_public_ip_on_launch = true tags = { Name = "Public Subnet" } } - Tạo một Internet Gateway nằm trong VPC, dùng để điều hướng traffic từ VPC ra internet và ngược lại
resource "aws_internet_gateway" "my_vpc_igw" { vpc_id = aws_vpc.my_vpc.id tags = { Name = "My VPC - Internet Gateway" } } - Tạo một Route Table và associate với Public Subnet, nó dùng để route traffic trong Public Subnet ra internet.
resource "aws_route_table" "my_vpc_ap_southeast_1a_public" { vpc_id = aws_vpc.my_vpc.id route { cidr_block = "0.0.0.0/0" gateway_id = aws_internet_gateway.my_vpc_igw.id } tags = { Name = "Public Subnet Route Table." } } resource "aws_route_table_association" "my_vpc_ap_southeast_1a_public" { subnet_id = aws_subnet.public.id route_table_id = aws_route_table.my_vpc_ap_southeast_1a_public.id } - Tạo một Security Group cho Public Instance, Security Group cho phép SSH và PING từ bên ngoài AWS vào Public Instance.
resource "aws_security_group" "allow_ssh" { name = "allow_ssh_sg" description = "Allow SSH inbound connections" vpc_id = aws_vpc.my_vpc.id ingress { from_port = 22 to_port = 22 protocol = "tcp" cidr_blocks = ["0.0.0.0/0"] } ingress { from_port = -1 to_port = -1 protocol = "icmp" cidr_blocks = ["0.0.0.0/0"] } egress { from_port = 0 to_port = 0 protocol = "-1" cidr_blocks = ["0.0.0.0/0"] } tags = { Name = "allow_ssh_sg" } } - Tạo Public Instance bên trong Public Subnet, Instance sử dụng lại Security Group vừa tạo bên trên
resource "aws_instance" "my_public" { ami = "ami-0b89f7b3f054b957e" instance_type = "t2.micro" key_name = "techmaster-03-ec2-public" #Chú ý: Đổi lại theo key name của bạn vpc_security_group_ids = [ aws_security_group.allow_ssh.id ] subnet_id = aws_subnet.public.id tags = { Name = "Public Instance" } } - Tạo một NAT Gateway bên trong Public Subnet, Elastic IP là bắt buộc thì tạo một NAT Gateway, vì vậy trong block code này bạn thấy code tạo Elastic IP trước, sau đó chúng ta gán Elastic IP vào NAT Gateway.
resource "aws_eip" "nat_gw_eip" { vpc = true } resource "aws_nat_gateway" "gw" { allocation_id = aws_eip.nat_gw_eip.id subnet_id = aws_subnet.public.id } - Phần setup trong Public Subnet đã xong, bây giờ chúng ta sẽ tạo Private Subnet và các thành phần bên trong nó:
resource "aws_subnet" "private" { vpc_id = aws_vpc.my_vpc.id cidr_block = "10.0.1.0/24" availability_zone = "ap-southeast-1a" tags = { Name = "Private Subnet" } } - Tạo một Route Table và associate với Private Subnet vừa tạo bên trên, nó dùng để route traffic trong Private Subnet đến NAT Gateway, từ đó có thể ra ngoài internet
resource "aws_route_table" "my_vpc_ap_southeast_1a_nated" { vpc_id = aws_vpc.my_vpc.id route { cidr_block = "0.0.0.0/0" nat_gateway_id = aws_nat_gateway.gw.id } tags = { Name = "Main Route Table for NAT-ed subnet" } } resource "aws_route_table_association" "my_vpc_ap_southeast_1a_nated" { subnet_id = aws_subnet.private.id route_table_id = aws_route_table.my_vpc_ap_southeast_1a_nated.id } - Tạo một Security Group cho Private Instance, Security Group cho phép SSH và PING chỉ từ bên trong mạng VPC. Ví dụ trong bài lab này là SSH và PING từ Bastion Host
resource "aws_security_group" "internal_ssh_and_ping" { name = "internal_ssh_and_ping_sg" description = "Allow SSH inbound connections from bastion host(public instance)" vpc_id = aws_vpc.my_vpc.id ingress { from_port = 22 to_port = 22 protocol = "tcp" cidr_blocks = ["10.0.0.0/16"] } ingress { from_port = -1 to_port = -1 protocol = "icmp" cidr_blocks = ["10.0.0.0/16"] } egress { from_port = 0 to_port = 0 protocol = "-1" cidr_blocks = ["0.0.0.0/0"] } tags = { Name = "internal_ssh_and_ping_sg" } } - Tạo Private Instance bên trong Private Subnet
resource "aws_instance" "my_private" { ami = "ami-0b89f7b3f054b957e" instance_type = "t2.micro" key_name = "techmaster-03-ec2-private" #Chú ý: Đổi lại theo key name của bạn vpc_security_group_ids = [ aws_security_group.internal_ssh_and_ping.id ] subnet_id = aws_subnet.private.id tags = { Name = "Private Instance" } } - Output thông tin gồm:
- Public IP của Public Instance, mình dùng IP này để PING và SSH vào Public Instance từ máy local.
- Private IP của Private Instance, mình dùng IP này để PING và SSH vào Private Instance từ Bastion Host.
output "public_ip" {
   description = "Public instance IP"
   value       = aws_instance.my_public.*.public_ip
 }

 output "private_ip" {
   description = "Private instance IP"
   value       = aws_instance.my_private.*.private_ip
 }
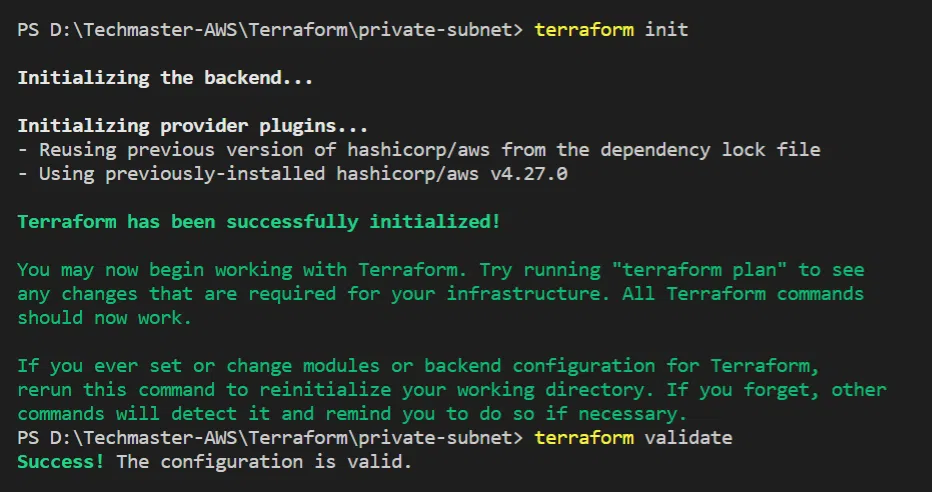
Các bước tạo Terraform code đã xong, bây giờ chúng ta tiến hành chạy code để triển trai hệ thống lên AWS.
terraform init
terraform validate
terraform apply -auto-approve
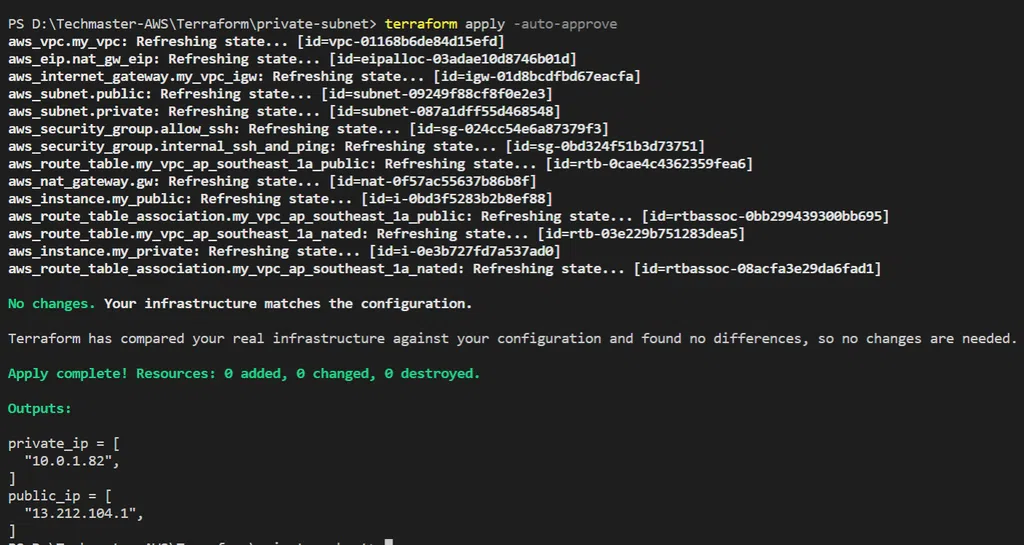
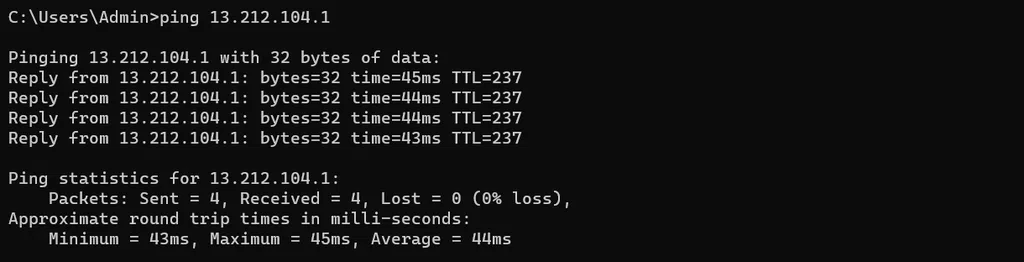
Sau khi code chạy xong, output trả ra Public IP của Public Instance và Private IP của Private Instance như chúng ta đã đề cập ở mục 12. Bây giờ chúng ta tiến hành test.
- PING vào Public IP của Public Instance
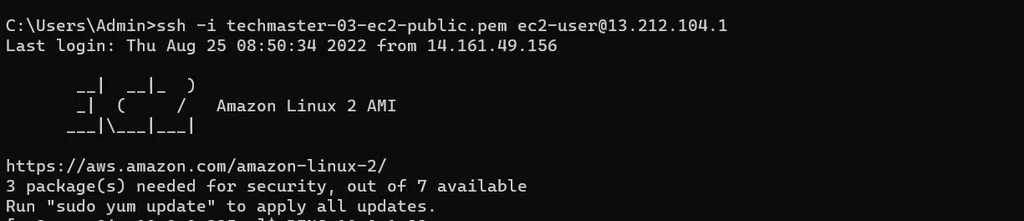
- SSH vào Public Instance bằng Public IP và keyname(lưu ý sử dụng đúng keyname trong code khi tạo instance)
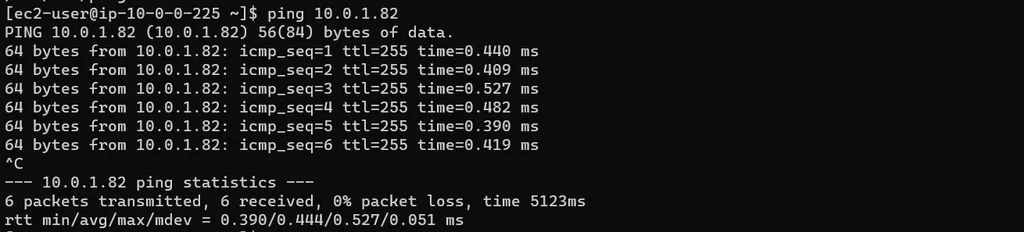
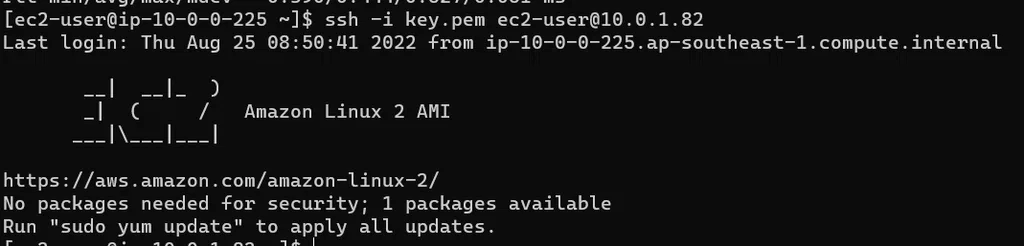
- Sau khi SSH vào được Public Instance:
- PING vào Private IP của Private Instance
- SSH vào Private Instance bằng Private IP và keyname(lưu ý sử dụng đúng keyname trong code khi tạo instance)
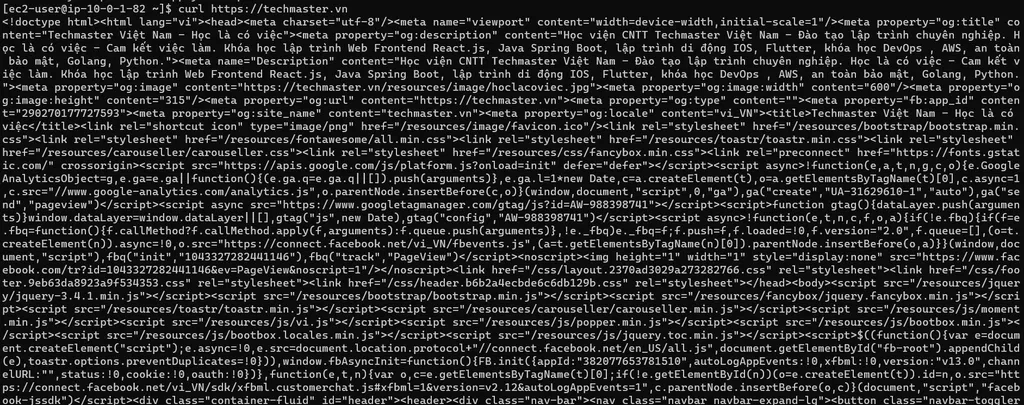
- Sau khi SSH vào được Private Instance, chúng ta kiểm tra xem Private Instance có truy cập được internet không bằng lệnh
curl https://techmaster.vn
- PING vào Private IP của Private Instance
Như vậy chúng ta đã hoàn thành bài lab và có thể test bằng các PING và SSH vào các con Public và Private Instances.
Bạn có thể tìm source của bài viết này tại đây.
Bình luận
Cảm ơn bạn đã dịch và biên tập một bài rất hay