Để hiểu rõ hơn về Spring:
- Spring phần 1: Spring là gì ? Giới thiệu Spring Framework trong Java
- Spring phần 2: Cài đặt Spring Tool Suite Cho Eclipse
Và cùng đến với Series Spring Core:
- Spring Core – Phần 1: Spring IoC , Inversion of Control trong Spring
- Spring Core – Phần 2: Spring Bean, Các scope trong Spring, Spring Bean Scope
- Spring Core – Phần 3: Spring Dependency Injection, DI trong Spring, so sánh CI – SI
- Spring Core – Phần 4: Spring Dependency Injection với Object, Collections, Map
- Spring Core – Phần 5: Spring AOP là gì? code ví dụ với Spring AOP
- Spring Core – Phần 6: AspectJ là gì? Spring AOP + AspectJ ví dụ với AspectJ
- Spring Core: Phần 7 – Spring PropertyPlaceholderConfigurer, lấy dữ liệu từ file properties
- Spring Core – Phần 8: Autowiring trong Spring, annotation @Autowired trong Spring, các kiểu autowiring
- Spring Core – Phần 9: Spring Auto Component Scanning, Các annotation hay dùng trong Spring
- Code ví dụ Spring đọc file từ resource folder (resources)
- Code ví dụ gửi email – gmail với Spring
1. Spring Auto Component Scanning
Thông thường, chúng ta khai báo tất cả các bean hoặc component trong file XML để Spring container có thể tìm và quản lý các bean.
Thực tế, Spring có khả năng tự động tìm, dò và tạo thể hiện của bean từ các định nghĩa ban đầu ở package, class mà không cần phải khai báo chúng trong file XML.
(Cách này thường dùng với các class không lưu trạng thái – không có thuộc tính, mà chỉ chứa các method)
Ví dụ Ta có class UserService.java gọi tới class UserDAO.java
package stackjava.com.autoscancomponent.demo;
public class UserDAO {
  public void findUser(int id) {
    System.out.println("find user by id = " + id);
  }
}
package stackjava.com.autoscancomponent.demo;
public class UserService {
private UserDAO userDAO;
public void findUser(int id) {
System.out.println("userService find:");
userDAO.findUser(id);
}
public UserDAO getUserDAO() {
return userDAO;
}
public void setUserDAO(UserDAO userDAO) {
this.userDAO = userDAO;
}
}applicationContext.xml
<?xml version="1.0" encoding="UTF-8"?>
<beans xmlns="http://www.springframework.org/schema/beans"
  xmlns:xsi="http://www.w3.org/2001/XMLSchema-instance" xmlns:p="http://www.springframework.org/schema/p"
  xsi:schemaLocation="http://www.springframework.org/schema/beans http://www.springframework.org/schema/beans/spring-beans-3.0.xsd">
  <bean id="userService" class="stackjava.com.autoscancomponent.demo.UserService">
    <property name="userDAO" ref="userDAO" />
  </bean>
  <bean id="userDAO" class="stackjava.com.autoscancomponent.demo.UserDAO">
  </bean>
</beans>
Demo:
package stackjava.com.autoscancomponent.demo;
import org.springframework.context.ApplicationContext;
import org.springframework.context.support.ClassPathXmlApplicationContext;
public class MainApp {
  public static void main(String[] args) {
    ApplicationContext context = new ClassPathXmlApplicationContext("applicationContext.xml");
    UserService userService = (UserService) context.getBean("userService");
    userService.findUser(1);
  }
}
Kết quả:
userService find:
find user by id = 1
Bây giờ ta chuyển sang dùng auto scan component:
package stackjava.com.autoscancomponent.demo;
import org.springframework.stereotype.Repository;
@Repository
public class UserDAO {
  public void findUser(int id) {
    System.out.println("find user by id = " + id);
  }
}
package stackjava.com.autoscancomponent.demo;
import org.springframework.beans.factory.annotation.Autowired;
import org.springframework.stereotype.Service;
@Service
public class UserService {
@Autowired
private UserDAO userDAO;
public void findUser(int id) {
System.out.println("userService find:");
userDAO.findUser(id);
}
}<beans xmlns="http://www.springframework.org/schema/beans"
xmlns:xsi="http://www.w3.org/2001/XMLSchema-instance" xmlns:context="http://www.springframework.org/schema/context"
xsi:schemaLocation="http://www.springframework.org/schema/beans
http://www.springframework.org/schema/beans/spring-beans-2.5.xsd
http://www.springframework.org/schema/context
http://www.springframework.org/schema/context/spring-context-2.5.xsd">
<context:component-scan base-package="stackjava.com.autoscancomponent.demo" />
</beans>Demo:
package stackjava.com.autoscancomponent.demo;
import org.springframework.context.ApplicationContext;
import org.springframework.context.support.ClassPathXmlApplicationContext;
public class MainApp {
  public static void main(String[] args) {
    ApplicationContext context = new ClassPathXmlApplicationContext("applicationContext.xml");
    UserService userService = (UserService) context.getBean("userService");
    userService.findUser(1);
  }
}
Kết quả:
userService find:
find user by id = 1
Rõ ràng cách viết này nhanh chóng hơn việc phải khai báo beans trong file XML rất nhiều.
Mình sẽ giải thích một số đoạn code trong ví dụ trên:
<context:component-scan base-package=”stackjava.com.autoscancomponent.demo” />: đánh dấu rằng spring container sẽ dò tìm (scan) tất cả các class trong package này để tìm các component.
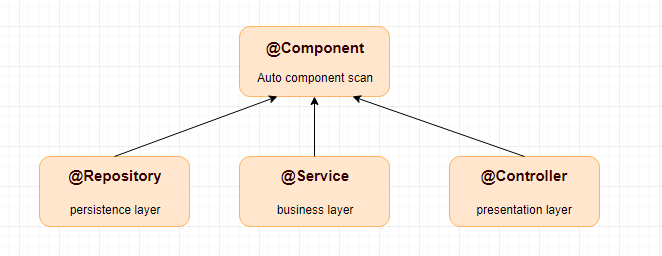
Các Annotation:
- @Component – biểu thị đây là một component được tự động scan.
- @Repository – biểu thị đây là một DAO component trong tầng persistence.
- @Service – biểu thị đây là một Service component trong tầng business.
- @Controller – biểu thị đây là một Controller component trong tầng presentation
Vậy khi nào dùng @Repository,@Service hay @Controller?
Thực ra cả 4 annotation này chỉ dùng với mục đích đánh đấu là auto component scan, bạn có thể dùng chúng lẫn lộn, hoặc nếu không rõ class đang ở tầng persistence, business hay presentation thì cứ dùng @Component nó vẫn hoạt động.
Tuy nhiên bạn nên dùng các annotation @Repository,@Service hay @Controller một cách phân biêt, phù hợp với các tầng chức năng của nó, như thế code của bạn sẽ dễ hiểu, dễ đọc hơn.
Lưu ý, mặc định bean được tạo từ auto scan component có tên là tên của class với chữ đầu tiên viết thường.
Ví dụ: UserService -> userService, UserDAO -> userDAO
Bạn có thể đổi tên của bean khi thực hiện scan bằng cách chỉ rõ tên của nó bên cạnh Annotation.
Ví dụ:
@Service("service1")
public class UserService {
  @Autowired
  private UserDAO userDAO;
  public void findUser(int id) {
    System.out.println("userService find:");
    userDAO.findUser(id);
  }
}
Khi lấy bean ta sẽ lấy theo tên được chỉ rõ là “service1”
ApplicationContext context = new ClassPathXmlApplicationContext("applicationContext.xml");
UserService userService = (UserService) context.getBean("service1");
userService.findUser(1);
Annotation @Autowired: được dùng để thực hiện 1 bean/thuộc tính khác vào đối tượng hiện tại (thuộc tính được inject vào cũng phải là 1 auto scan component hoặc được khai báo bean trong file config)
Loạt bài chủ đề Java trên trang stackjava.com bản quyền thuộc thầy Trần Hữu Cương. Bài viết đăng trên blog Techmaster được sự đồng ý của tác giả.
Thầy Trần Hữu Cương đã và đang tham gia giảng dạy tại Techmater khoá Lộ trình Java Spring Boot Full Stack
Link gốc bài viết tại đây.
Bình luận