Để hiểu rõ hơn về Spring:
- Spring phần 1: Spring là gì ? Giới thiệu Spring Framework trong Java
- Spring phần 2: Cài đặt Spring Tool Suite Cho Eclipse
Và cùng đến với Series Spring Core:
- Spring Core – Phần 1: Spring IoC , Inversion of Control trong Spring
- Spring Core – Phần 2: Spring Bean, Các scope trong Spring, Spring Bean Scope
- Spring Core – Phần 3: Spring Dependency Injection, DI trong Spring, so sánh CI – SI
- Spring Core – Phần 4: Spring Dependency Injection với Object, Collections, Map
- Spring Core – Phần 5: Spring AOP là gì? code ví dụ với Spring AOP
- Spring Core – Phần 6: AspectJ là gì? Spring AOP + AspectJ ví dụ với AspectJ
- Spring Core: Phần 7 – Spring PropertyPlaceholderConfigurer, lấy dữ liệu từ file properties
- Spring Core – Phần 8: Autowiring trong Spring, annotation @Autowired trong Spring, các kiểu autowiring
- Spring Core – Phần 9: Spring Auto Component Scanning, Các annotation hay dùng trong Spring
- Code ví dụ Spring đọc file từ resource folder (resources)
- Code ví dụ gửi email – gmail với Spring
1. AspectJ là gì?
AspectJ là một thư viện, đặc tả trong Java để thực hiện AOP.
Tương tự với Spring AOP mà ta đã sử dụng ở bài trước. Tuy nhiên nó cung cấp các annotation, sử dụng đơn giản hơn.
Tương tự như Spring AOP, thay vì định nghĩa trong Bean, AspectJ cung cấp các annotation để định nghĩa các pointcut, advice, target object…
Các Annotation chung chủa AspectJ gồm:
- @Before: Chạy trước khi method được thực thi
- @After: Chạy sau khi method trả về một kết quả
- @AfterReturning: Chạy sau khi method trả về một kết quả, lọc lấy kết quả trả về
- @AfterThrowing: Chạy khi method xảy ra exception
- @Around: Gồm các tất cả các advice trên
- @Aspect: Đánh dấu đây là 1 aspect
2. Ví dụ với Spring AOP + AspectJ
Mình vẫn tiếp tục dùng lại ví dụ lần trước nhưng sử dụng AspectJ
Tạo Class Hello.java
package stackjava.com.springaspectj;
public class Hello {
  public void method1() {
    System.out.println("+++++++++++++++++++++++++++++++");
    System.out.println("method 1");
  }
  public String method2() {
    System.out.println("+++++++++++++++++++++++++++++++");
    System.out.println("method 2");
    return "hello";
  }
  public void method3() {
    System.out.println("+++++++++++++++++++++++++++++++");
    System.out.println("method 3");
    throw new IllegalArgumentException();
  }
}
Khai báo thư viện để sử dụng Spring AOP và AspectJ
<project xmlns="http://maven.apache.org/POM/4.0.0" xmlns:xsi="http://www.w3.org/2001/XMLSchema-instance"
  xsi:schemaLocation="http://maven.apache.org/POM/4.0.0 http://maven.apache.org/xsd/maven-4.0.0.xsd">
  <modelVersion>4.0.0</modelVersion>
  <groupId>stackjava.com</groupId>
  <artifactId>SpringAspectJ</artifactId>
  <version>0.0.1-SNAPSHOT</version>
  <properties>
    <spring.version>4.3.13.RELEASE</spring.version>
  </properties>
  <dependencies>
    <dependency>
      <groupId>org.springframework</groupId>
      <artifactId>spring-core</artifactId>
      <version>${spring.version}</version>
    </dependency>
    <!-- https://mvnrepository.com/artifact/org.springframework/spring-beans -->
    <dependency>
      <groupId>org.springframework</groupId>
      <artifactId>spring-beans</artifactId>
      <version>${spring.version}</version>
    </dependency>
    <!-- https://mvnrepository.com/artifact/org.springframework/spring-context -->
    <dependency>
      <groupId>org.springframework</groupId>
      <artifactId>spring-context</artifactId>
      <version>${spring.version}</version>
    </dependency>
    <!-- https://mvnrepository.com/artifact/org.springframework/spring-aop -->
    <dependency>
      <groupId>org.springframework</groupId>
      <artifactId>spring-aop</artifactId>
      <version>4.3.13.RELEASE</version>
    </dependency>
    <!-- AspectJ -->
    <dependency>
      <groupId>org.aspectj</groupId>
      <artifactId>aspectjrt</artifactId>
      <version>1.6.11</version>
    </dependency>
    <dependency>
      <groupId>org.aspectj</groupId>
      <artifactId>aspectjweaver</artifactId>
      <version>1.6.11</version>
    </dependency>
  </dependencies>
</project>
Tạo Asepct bằng cách dùng Annotation @Aspect
package stackjava.com.springaspectj;
import org.aspectj.lang.JoinPoint;
import org.aspectj.lang.annotation.Aspect;
import org.aspectj.lang.annotation.Before;
@Aspect
public class LoggerAspectJ {
  @Before("execution(* stackjava.com.springaspectj.Hello.*(..))")
  public void logBefore(JoinPoint joinPoint) {
    System.out.println("before method: " + joinPoint.getSignature().getName());
  }
}
“execution(* stackjava.com.springaspectj.Hello.*(..))”: định nghĩa pointcut: ở đây thực hiện pointcut với tất cả các method của class Hello.java
Ví dụ mình đổi thành “execution(* stackjava.com.springaspectj.Hello.method2(..))” thì nó chỉ thực hiện pointcut với method2 của class Hello.java
Cấu hình bean và AspectJ trong file config
applicationContext.xml
<beans xmlns="http://www.springframework.org/schema/beans"
  xmlns:xsi="http://www.w3.org/2001/XMLSchema-instance" xmlns:aop="http://www.springframework.org/schema/aop"
  xsi:schemaLocation="http://www.springframework.org/schema/beans
  http://www.springframework.org/schema/beans/spring-beans-3.0.xsd
  http://www.springframework.org/schema/aop
  http://www.springframework.org/schema/aop/spring-aop-3.0.xsd ">
  <aop:aspectj-autoproxy></aop:aspectj-autoproxy>
  <bean id="hello" class="stackjava.com.springaspectj.Hello" />
  <!-- Aspect -->
  <bean id="logAspect" class="stackjava.com.springaspectj.LoggerAspectJ" />
</beans>
<aop:aspectj-autoproxy /> được dùng để định nghĩa Aspect. để sử dụng thẻ này chúng ta phải khai báo namespace aop cho nó:
Click vào file applicationContext.xml > Chọn tab Namespaces > chọn aop
(Lưu ý, eclipse của bạn phải cài spring tool mới có tab Namespaces, nếu chưa cài thì bạn phải thêm namespace bằng tay thôi =)) )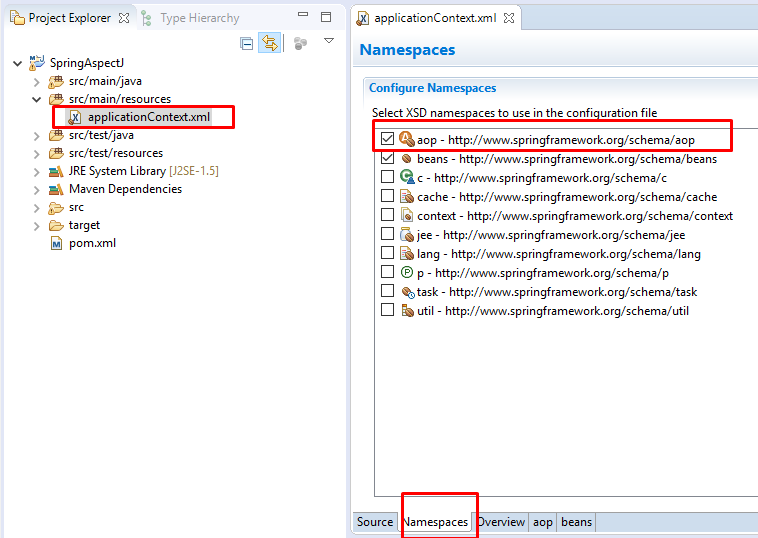
Sau khi chọn, namespace sẽ tự động được thêm vào file config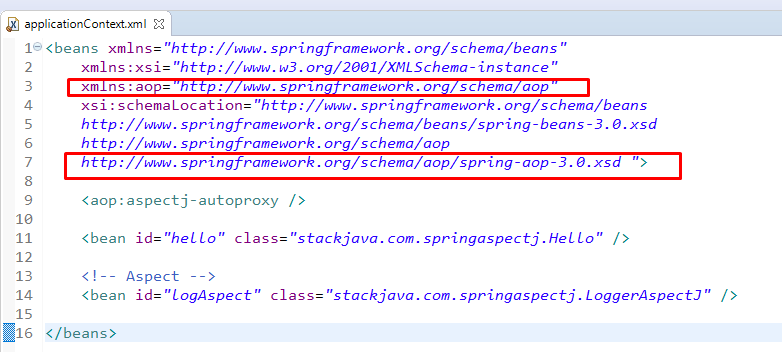
Demo:
package stackjava.com.springaspectj;
import org.springframework.context.ApplicationContext;
import org.springframework.context.support.ClassPathXmlApplicationContext;
public class MainApp {
  public static void main(String[] args) throws Exception {
    ApplicationContext context = new ClassPathXmlApplicationContext("applicationContext.xml");
    Hello hello = (Hello) context.getBean("hello");
    hello.method1();
    System.out.println("\n");
    hello.method2();
  }
}
Kết quả:
before method: method1
+++++++++++++++++++++++++++++++
method 1
before method: method2
+++++++++++++++++++++++++++++++
method 2
Tương tự ta tạo các advice thực hiện @After, @AfterReturning, @AfterThrowing, @Around
package stackjava.com.springaspectj;
import org.aspectj.lang.JoinPoint;
import org.aspectj.lang.annotation.After;
import org.aspectj.lang.annotation.AfterReturning;
import org.aspectj.lang.annotation.AfterThrowing;
import org.aspectj.lang.annotation.Around;
import org.aspectj.lang.annotation.Aspect;
import org.aspectj.lang.annotation.Before;
@Aspect
public class LoggerAspectJ {
  @Before("execution(* stackjava.com.springaspectj.Hello.*(..))")
  public void logBefore(JoinPoint joinPoint) {
    System.out.println("before method: " + joinPoint.getSignature().getName());
  }

  @After("execution(* stackjava.com.springaspectj.Hello.*(..))")
  public void logAfter(JoinPoint joinPoint) {
    System.out.println("before method: " + joinPoint.getSignature().getName());
  }
  // chỉ thực hiện log với method2 của Hello.java
  @AfterReturning(pointcut = "execution(* stackjava.com.springaspectj.Hello.method2(..))", returning = "result")
  public void logAfterReturning(JoinPoint joinPoint, Object result) {
    System.out.println("after return method : " + joinPoint.getSignature().getName());
    System.out.println("Method returned value is : " + result);
  }
  @AfterThrowing(pointcut = "execution(* stackjava.com.springaspectj.Hello.*(..))", throwing = "error")
  public void logThrow(JoinPoint joinPoint, Throwable error) {
    System.out.println("exception in method: " + joinPoint.getSignature().getName());
    System.out.println("Exception is: " + error);
  }
}
Demo:
package stackjava.com.springaspectj;
import org.springframework.context.ApplicationContext;
import org.springframework.context.support.ClassPathXmlApplicationContext;
public class MainApp {
  public static void main(String[] args) throws Exception {
    ApplicationContext context = new ClassPathXmlApplicationContext("applicationContext.xml");
    Hello hello = (Hello) context.getBean("hello");
    hello.method1();
    System.out.println("\n");
    hello.method2();
    System.out.println("\n");
    hello.method3();
  }
}
Kết quả:
before method: method1 +++++++++++++++++++++++++++++++ method 1 before method: method2 +++++++++++++++++++++++++++++++ method 2 after return method : method2 Method returned value is : hello before method: method3 +++++++++++++++++++++++++++++++ method 3 exception in method: method3 Exception is: java.lang.IllegalArgumentExceptionOkay, Done!
Loạt bài chủ đề Java trên trang stackjava.com bản quyền thuộc thầy Trần Hữu Cương. Bài viết đăng trên blog Techmaster được sự đồng ý của tác giả.
Thầy Trần Hữu Cương đã và đang tham gia giảng dạy tại Techmater khoá Lộ trình Java Spring Boot Full Stack
Link gốc bài viết tại đây.
Bình luận